Learn TYPO3
Redirects are a very commonly utilized technique in web development. When configured, they will send the visitor of a particular URL or a domain name to a different destination, which is typically a different domain name or URL.
The most regular usage of URL redirection is performed when you want to either move content from one page/URL to a different one or when you want to completely change the domain name of your CMS. Typically, these redirects are implemented via snippets of code inserted into the configuration files of the webserver, such as Apache and Nginx, or the .htaccess file of your website.
In this tutorial, we will focus on the way to set up redirections directly from the TYPO3 administrative area, which is a lot easier, intuitive, and requires no server-side knowledge at all. Let’s begin.
To start setting up redirects in TYPO3, please log into your admin dashboard first. To do that, please add “/typo3” to your domain name - for example, “mycms.com/typo3” where “mycms.com” is your actual domain.

Accessing the mentioned URL will show a login page, where you have to enter your login credentials to access the backend. We also highly recommend checking our TYPO3 Backend Overview tutorial, which will teach you the basics.
Once you have logged inside your dashboard, please point your attention to the left, where you will see the Module Menu.

Right under the “Site Management” section, you will see the “Redirects” option. When you click on it, the page will be refreshed, and you will see the “Redirects” section in the middle.

If there are currently no present redirects, you will see the message “No redirects found!”, located on the upper side of the page. Underneath, you will find the “Create new redirects” button. Please press it to begin your redirect configuration.
Clicking the “Create new redirects” button will refresh the page, and you will find yourself on the “Create new Redirect on root level” page. On this page, you will see two tabs - the “General” tab and the “Access” tab.

By default, you will see the “General” tab open, where you will be performing the most tweaks regarding the new redirection.
Let’s go over all of the available options under this tab.
For the purposes of this tutorial, we will be redirecting a page we created using the page tree in TYPO3 called “/hostarmada-tutorials” to our website “http://hostarmada.com”. This redirect will be permanent and will also force SSL redirection.

Please refer to the screenshot above to see how the settings will look like.
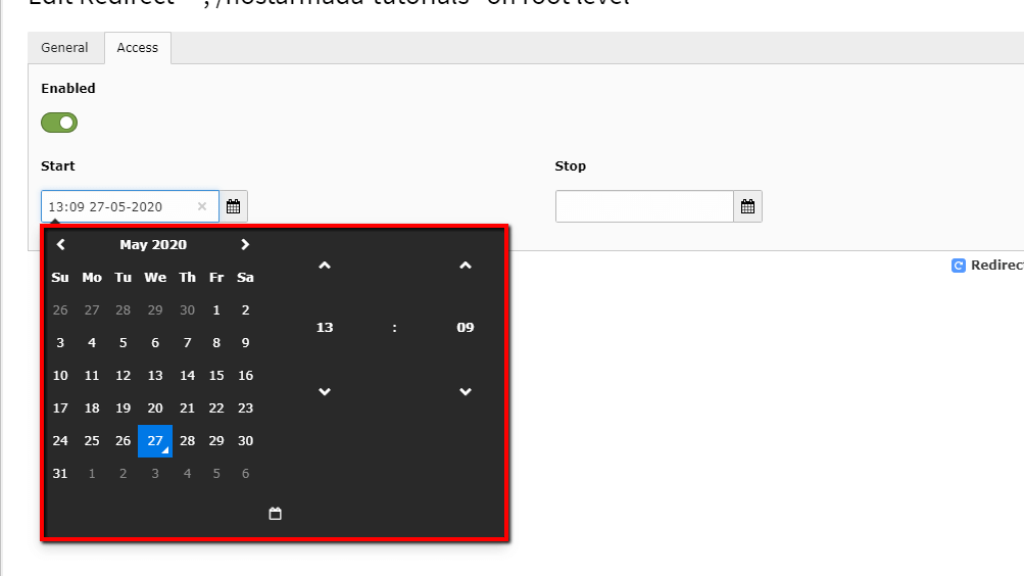
To access this tab, please click on the “Access” sign, located on the right side of the “General” tab.

The settings under this tab will allow you to set a timeframe in which this redirection will be active. This could be useful if you are running an ad campaign, and you want to direct all your traffic to a specific page during the time your campaign lasts and then bring everything back to normal. Setting this up is very easy - all you need to do is make sure that the “Enabled” toggle switch is highlighted in green.

Finally, you need to use the two fields under the “Start” and “Stop” labels to set a starting point and an endpoint for this redirection. Clicking on these fields will open up a window containing a calendar and a clock tool, letting you set the date/time in which you want this redirection to start and respectively end.
Once all the requested information is submitted, please click on the “Save” button located on the top left side of the page.

Now that your redirect is saved, you can visit the page and test it out. We are going to enter the URL “http://typo3.hostarmadatutorials.com/hostarmada-tutorials” in our browser.

This action immediately redirects us to our main site, “https://hostarmada.com”.

There you have it! The way you can easily and intuitively create URL redirections from the convenience of your admin dashboard in Typo3. If you are having issues handling this on your own or the redirects are not working as expected, you can ask our Technical Team for assistance. They are really resourceful and will definitely have a solution you may use. You can reach them 24/7 through the ticketing system in your Client Area.

Sebahat is a young and bright woman who has become an invaluable part of our team. She started as a Customer Care Representative, mastering that role and, along the way, growing into a tech-savvy individual who is well acquainted with every support layer of the company. Driven by her aim to improve our customers’ experience constantly, she is committed to enhancing the extraordinary support we deliver.
Learn more about TYPO3 in the other tutorials that we have: