Optimization / Tuesday June 2, 2026
How to Optimize WordPress with Autoptimize and Cache Enabler

If you’re wondering how to optimize WordPress with Autoptimize and Cache Enabler, the answer is simple: use Cache Enabler for page caching and Autoptimize for CSS, JavaScript, HTML, and image optimization. Together, these plugins can significantly improve page load times, reduce server requests, and enhance Core Web Vitals without requiring advanced technical knowledge.
Website speed plays a critical role in user experience, search engine rankings, and conversion rates. A slow-loading website can increase bounce rates and negatively impact SEO performance. Let’s explore how to install, configure, and test Autoptimize and Cache Enabler to maximize WordPress performance. We’ll also show you which settings to use, common mistakes to avoid, and how to verify that your optimizations are delivering measurable speed improvements.
Autoptimize and Cache Enabler: Plugin Overview
Autoptimize and Cache Enabler are two lightweight WordPress performance plugins that work together to improve website speed and reduce page load times.
Cache-Enabler creates static HTML versions of your pages and serves them to visitors instead of generating content dynamically with every request. This reduces server load and helps pages load faster, especially during traffic spikes.
Autoptimize focuses on front-end optimization by minimizing, combining, and compressing CSS, JavaScript, and HTML files. It also includes features such as image optimization, lazy loading, Google Fonts optimization, and critical CSS support to further improve performance.
When used together, Cache Enabler handles page caching while Autoptimize manages code and asset optimization. This combination can help improve Core Web Vitals, enhance user experience, and boost overall WordPress performance without requiring complex configuration.
Note: Before installing these plugins, check whether your hosting provider already includes server-level caching or optimization features to avoid conflicts and duplicate functionality.
When Should You Use Autoptimize and Cache Enabler?
Autoptimize and Cache Enabler work best for WordPress websites running on Apache or Nginx servers that need a lightweight caching and optimization solution. This combination is particularly useful when your hosting environment does not already include advanced server-level caching.
Before enabling both plugins, make sure you are not duplicating caching or optimization features provided by your hosting provider or other performance plugins. After enabling JavaScript and CSS aggregation, thoroughly test your website to ensure all design elements and functionality work correctly. If you operate an eCommerce website with WooCommerce or similar platforms, exclude cart, checkout, and account pages from caching to prevent issues with dynamic content and user sessions.
How to Install Autoptimize and Cache Enabler
The installation process of these two plugins is no different than installing any standard WordPress plugin.
First, you need to log into your WordPress Admin Dashboard and navigate to Plugins > Add New. This action will redirect you to the plugin installation page where you can use the search tool. By entering “Cache Enabler” into the search field, you will not only be presented with the Cache Enabler plugin but Autoptimize as well!

Click the “Install Now” button for both plugins, then activate them to make them functional on your WordPress website.
Recommended Autoptimize and Cache Enabler Settings
As we mentioned earlier, the plugins’ default settings are enough to drastically speed up your WordPress website. There are useful configuration options under their settings pages that are strictly individual and vary from site to site. To save you the time and effort of researching and learning about them, we have assembled the settings we believe are optimal.
‼️ Important: Always back up your website before modifying cache, minification, image optimization, or lazy-loading settings. After applying any changes, clear all website, plugin, CDN, and browser caches to ensure the new configuration is loaded correctly. It is also recommended to test your website in a private browser window to verify that visitors receive the optimized version of your pages.
1. Cache Enabler Settings
To access the Cache Enabler configuration options, go to Settings > Cache Enabler.

The first thing you are going to notice and probably tell yourself is, “Hey, there isn’t much here I can do”. Well, this is what makes this plugin great. The developers have baked everything necessary inside its core, so you do not get overwhelmed by multiple pages of settings, which could also end up harming your site. Here are your options:

Cache Expiry
This is pretty self-explanatory. Inside this text field, you can define the lasting time (in hours) for the generated cache of the plugin. The default setting here is 0, which means it never expires. We will recommend that you leave it with the default value unless you regularly add content to your website. In such a scenario, specifying the time corresponding to your routine could save you from the need to manually remove the cache to see the latest changes you have applied.
Cache Behavior
Instead of setting a cache expiry using the above text field, you can modify the cache’s behavior with the various options presented here. You will see five checkboxes, each specifying a condition that will trigger a cache wipe:
1. Clear the complete cache if a new post has been published (instead of only the home page cache). If you tick this checkbox, ALL of the Cache Enabler’s cache will flush once you publish a new post. If left unchecked, only the home page’s cache will be cleared. If you submit posts regularly, turning this on will not be the best idea, as the cache will have to rebuild itself frequently, and you will not see much benefit from it.
2. Clear the complete cache if a new comment has been posted (instead of only the page-specific cache). When checked, this option clears ALL the plugin’s cache after someone adds a new comment. We do not recommend using this option if your posts receive a lot of comments, as you will barely notice the benefits of the cache.
3. Pre-compression of cached pages. Needs to be disabled if the decoding fails in the web browser. – This setting will activate compression for your pages. It is useful to have unless your server has either gzip or brotli, compression. If you are hosting your website with HostArmada, you do not need to activate it. We support gzip on our Start Dock and Web Warp plans utilizing NGINX and brotli on our Speed Reaper plan utilizing the highly efficient LiteSpeed server.
4. Create an additional cached version for WebP image support. Convert your images to WebP with Optimus. – As we mentioned earlier, Cache-Enabler is one of the first plugins to introduce WebP support. However, to utilize this option, you need to convert your images to WebP. You may do so using the Optimus plugin. It has a free version that you can test out, and if you like it, you may use the premium plans, which are quite affordable. When this checkbox is selected, Cache-Enabler will add cache support for your WebP images.
5. Clear the complete cache if any plugin has been upgraded. – The best option here is to tick this checkbox. With a new release, the developers could implement new functionality that may require a cache purge to be enabled.
Cache Exclusions
This section in the plugin configuration page includes three text fields that can help you exclude pages or posts from the cache. You can use the first text field to define in a comma-separated page or post IDs that you do not want to be cached. Inside the second text field, you can enter Regular Expressions matching a specific page path that you want to exclude. Finally, you can use the third text field to specify Regexes that match cookies, which should bypass the cache.
Cache Inclusions
The cache inclusion section has a single text field, which will allow you to add pages that you NEED to be cached, regardless of any exclusions you implemented above.
Cache Minifications
If you plan to combine the Cache-Enabler plugin with Autoptimize, then any cache minification should be disabled, as this is Autoptimize’s bread and butter. If you want to use Cache-Enabler on its own, then you should use this drop-down and enable minification for HTML and Inline JavaScript.
2. Autoptimize Settings
To access the Autoptimize configuration page, go to Settings > Autoptimize.

As opposed to the Cache-Enabler, Autoptimize offers a wide variety of configuration options on its settings page. Some of them can have a positive impact on your site in terms of speed or page score (if this is something you care about), whereas others may slow down your site. It depends on the site, so it is tough to predict its demeanor. The settings we will provide here will be optimal for most websites; however, if you see a drop in performance, you should simply deactivate the setting causing this, and you will be fine.
Autoptimize has its settings distributed under five separate tabs. We will start with the first one – the “JS, CSS, and HTML” tab.

JavaScript Options
Optimize JavaScript Code?
Enable this option to minify your JavaScript files and reduce their size. This can improve loading times, especially on larger websites that use many JavaScript resources. On smaller websites, the impact may be less noticeable because browsers often cache JavaScript files after the first visit.
Aggregate JS Files?
This setting combines multiple JavaScript files into a single file, reducing the number of requests made by the browser. It can be beneficial on servers that do not support HTTP/2 or HTTP/3. If your hosting environment already uses modern protocols, test this option before enabling it permanently, as it may not provide additional performance benefits.
Also Aggregate Inline JS?
We recommend leaving this option disabled. In most cases, it offers little to no performance improvement and may increase cache complexity or cause compatibility issues.
Force JavaScript in <head>?
We recommend keeping this setting disabled. Loading JavaScript in the page header can create render-blocking resources, forcing browsers to pause page rendering until scripts are downloaded and executed. This can negatively affect page speed and Core Web Vitals.
Exclude Scripts from Autoptimize
Use this field to exclude specific JavaScript files from optimization. This is useful if a script stops working after minification or aggregation. By default, Autoptimize excludes several important WordPress and jQuery-related files to prevent compatibility issues.
Add Try-Catch Wrapping?
This option is primarily intended for troubleshooting JavaScript errors. When enabled, Autoptimize wraps JavaScript code in try-catch statements, making it easier to identify problematic scripts. Most users can leave this setting disabled unless they are actively debugging JavaScript issues.
CSS Options
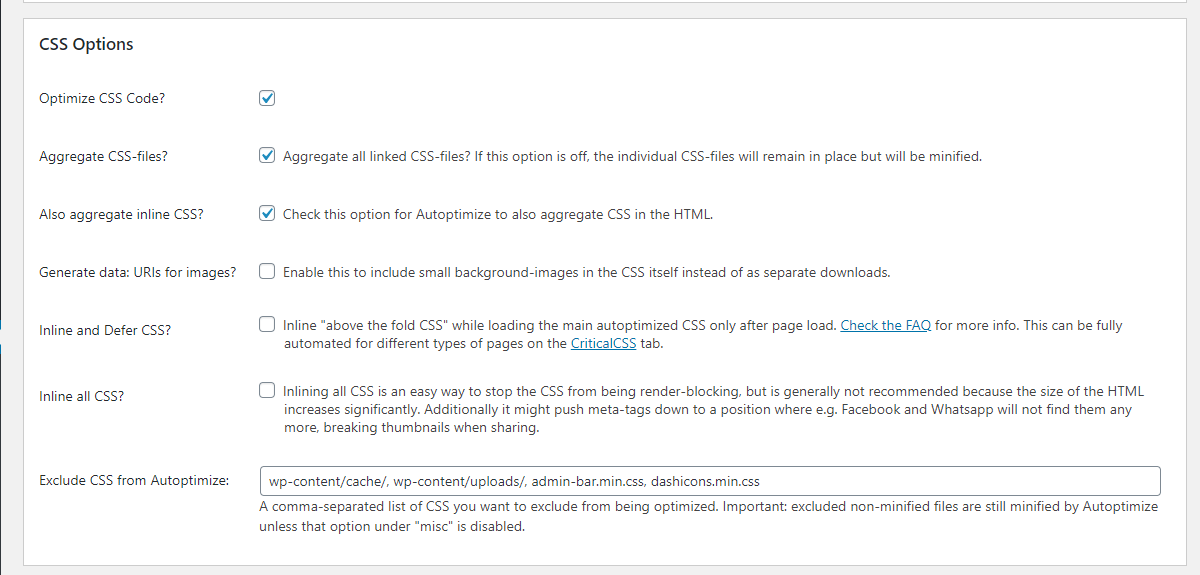
Optimize CSS Code?
Enable this option to minify your CSS files and reduce their size. This can help your website load faster, especially if it uses multiple stylesheets or a large theme. On smaller websites, the improvement may be less noticeable but is still worth testing.
Aggregate CSS Files?
This setting combines multiple CSS files into one file, reducing the number of browser requests. It can be helpful on older hosting setups or servers that do not fully benefit from HTTP/2 or HTTP/3. If your website already performs well, test this setting first to make sure it does not affect the layout or design.
Also Aggregate Inline CSS?
This option combines inline CSS with your optimized CSS files. It may reduce page size in some cases, but it can also increase cache complexity. We recommend leaving it disabled unless testing shows a clear performance improvement.
Generate Data: URIs for Images?
This setting embeds small background images directly into your CSS files. It can reduce the number of HTTP requests, but it may also increase CSS file size. Use this option only after testing its effect on your website speed.
Inline and Defer CSS?
This option can improve above-the-fold loading by inlining critical CSS and delaying the rest. However, it requires properly generated critical CSS. If it is not configured correctly, it may cause layout issues or a flash of unstyled content. Use it carefully and test your pages after enabling it.
Inline All CSS?
We recommend keeping this option disabled. Inlining all CSS can increase page size, reduce browser caching benefits, and slow down larger websites.
Exclude CSS from Autoptimize
Use this field to exclude specific CSS files from optimization. This is useful if a layout, menu, plugin, or design element breaks after CSS minification or aggregation. Autoptimize excludes some common WordPress files by default to help prevent compatibility issues.
HTML Options
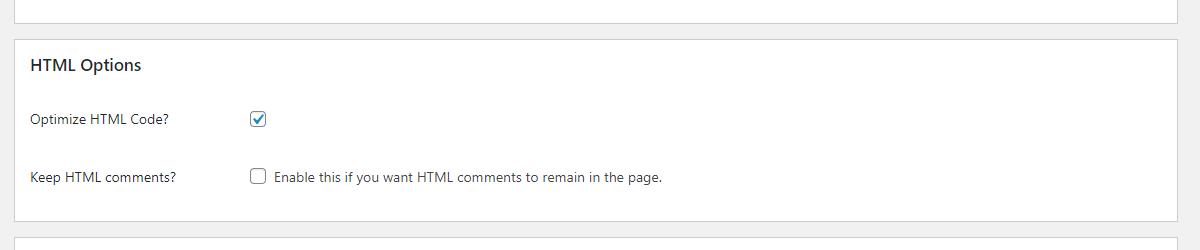
- Optimize HTML Code? Enabling this option will activate minification for your HTML files, effectively removing unnecessary characters from these files (such as whitespaces), reducing their size. In practice, this option works great on most websites; however, it can cause issues sometimes. Thus, it is better to activate it and see how your website will behave.
- Keep HTML comments? If you select this option, Autoptimize will keep the comments for the HTML pages optimized.
CDN Options

CDN Base URL – If you are using a CDN, you can enter your CDN-based URL inside to serve static pages from there. If you are using Cloudflare or any other proxy-based CDN service, this option will not be necessary.
Cache Info

This section of the page will show you the cache folder, which is writable, and its size is shown. It is useful to keep track of your cache disk usage and to verify whether the cache is working correctly.
Misc Options

- Save aggregated script/css as static files? – You should leave this option selected unless your server does not handle expiry and compression correctly.
- Minify excluded CSS and JS files? – If you enable this option, your CSS and JS files will benefit from minification, regardless of whether they are excluded from the cache or aggregated.
- Enable 404 fallbacks? – This is a great recent addition to the Autoptimize arsenal. It ensures that your visitor will see a “fallback” version of a page if, for some reason, the cached plugin content is no longer present. To ensure the proper delivery of the “fallback” page, please add the following snippet of code in your .htaccess file:
ErrorDocument 404 wp-content/autoptimize_404_handler.php
- Also optimize for logged in editors/ administrators? – You will typically see this option enabled by default on a fresh Autoptimize installation. However, we do not reckon it is necessary. To begin with, logged in users and admins will usually not pay that much attention to performance, and the speed benefits will not be that substantial. In addition to that, you are keeping things a lot cleaner, not having to deal with the extra cache.
- Also optimize shop cart/ checkout? – The cart/checkout page is very delicate, and we would recommend everyone disable any kind of cache form on it.
Next is the “Images” tab, where Autoptimize offers two options that will help reduce the size of images or enable the “lazy-load” images.

- Optimize Images – Checking this option will allow you to utilize the built-in image optimization of Autoptimize, delivered by ShortPixel, a well-known image optimization plugin. We would like to discourage users from using this option and, instead, use the standalone ShortPixel plugin or similar ones such as WPSmushor EWWW Image Optimizer.
- Lazy-load images – Lazy-load is a robust option if you have many pictures on your page located under the fold (the upper area of the site). It can result in a huge page speed increase. If the majority of your images are above the fold, consider disabling this, or you risk negatively impacting your visitor’s UX.
- Lazy-load exclusions – If you want to use lazy-load, although you have many pictures above the fold, this option comes in handy. You can use this text field to exclude images from the lazy-load functionality.
Earlier, we pointed out that there were two methods of generating critical CSS for your site. Well, this is the API based method, which is handled by criticalcss.com.
In the content boxes provided on the “Critical CSS” tab of Autoptimize, you need to enter your API key so that the setting under the “CSS Options” regarding “Inline and Defer CSS” can be fetched by the criticalcss.com API.
Critical CSS

- Your API Key – When you register at criticalcss.com, please enter your API key so that your website can communicate with their servers and generate CCSS for your site.
The second-to-last tab is the “Extra” tab, containing neat little tuning tricks that can boost your performance even further when using Autoptimize.

- Google Fonts – The provided options will highly vary based on how much your site relies on Google Fonts. The default choice will bring no performance-enhancing benefit to your site. Play around with the last three options to see which one brings the most benefits in terms of speed. Alternatively, you can use a custom system font stack and altogether remove Google Fonts. If you manage to pull that one out, you can expect a considerable performance boost!
- Remove Emojis – This is an excellent option for reducing page size and removing any un-optimized JavaScript and CSS content represented by the WordPress core emojis.
- Remove query strings from static resources – If you care about your website’s page score, you can enable this option. It will not provide any speed benefits whatsoever.
- Preconnect to 3rd party domains – Enabling this option lets you use the “preconnect” directive, allowing the browser to connect to remote domain names preemptively. Typically, you are loading various content from them, and this can improve the time needed to fetch these resources. To discover the third party domains, please open GoogleChrome and click “F12”, from the console, then please choose “Sources” from the top menu. On the left side, you will see a list of pages, with your domain being on top and all the external ones listed underneath. To “preconnect” to these domains, please specify them inside this text field and use a comma to separate them. Even if you are not using Google Chrome, any up-to-date web browser should have the same functionality, accessible in a similar manner.
- Preload specific requests – Unless you are very familiar with the assets your website needs to download and use before anything else, we recommend leaving this setting alone. If you genuinely want to use this option, you should consult with a certified web developer.
- Async JavaScript files – You should test this around and see how your website behaves. It will cause your third-party JavaScript resources to load asynchronously by embedding the “async” tag.
- Optimize YouTube Videos – This last setting will recommend installing the “WP YouTube Lyte” plugin, which adds lazy-load effects to the YouTube videos on your site. It could be useful if you have a website that features a lot of YouTube videos.
Lastly, the “Optimize More!” tab will include various third-party vendors that Autoptimize recommends that can help you improve your website’s loading speed, even further!
WordPress Speed Test Before Optimization
Now that we have covered the configuration options for both plugins, let’s get to the fun part and see the performance difference after implementing them!

As you can see, the results are pretty decent, with a loading speed of around 4 seconds and about 75% even without no optimizations.
WordPress Speed Test After Optimization
After both plugins are enabled and after applying our recommended settings, here is the result:

As you can see, the load speed became almost 3x faster, and the scores skyrocketed to about 95%, not to mention that the TTFB went down from 600 milliseconds to about 150 milliseconds. The number of requests got reduced dramatically, and the total page size dropped to 1MB, which is nearly a perfect score!
Recommended Testing Checklist
After configuring Autoptimize and Cache Enabler, test your website thoroughly to ensure that optimization settings do not negatively affect functionality or user experience.
Use the following checklist:
- Verify that the homepage loads correctly.
- Check several blog posts and content pages.
- Test all contact forms and lead-generation forms.
- Test WooCommerce cart and checkout pages (if applicable).
- Review the mobile version of your website.
- Check the website while logged out to simulate a visitor’s experience.
- Run performance tests using Google PageSpeed Insights.
- Run additional speed tests using GTmetrix.
- Review browser console logs for JavaScript or CSS errors.
- Confirm that images, fonts, menus, and interactive elements load properly.
Final Recommendations for WordPress Optimization
Autoptimize and Cache Enabler can be a strong combination for improving WordPress speed when configured correctly. Cache Enabler helps reduce server load by creating static versions of your pages, while Autoptimize improves front-end performance by optimizing CSS, JavaScript, HTML, images, and other assets.
After enabling both plugins, test your website carefully to make sure all pages, forms, menus, images, and interactive elements work as expected. Pay special attention to mobile performance, Core Web Vitals, and any pages that rely on dynamic content, such as cart, checkout, or account pages.
For the best results, avoid enabling overlapping optimization features from multiple plugins or your hosting provider. If your website is hosted with HostArmada and you are unsure which settings to use, our technical support team can review your setup and recommend the safest optimization approach for your site.
FAQs
Yes. Autoptimize and Cache Enabler are designed to complement each other. Cache Enabler handles page caching, while Autoptimize focuses on optimizing CSS, JavaScript, HTML, and images to improve WordPress performance.
Yes, but WooCommerce store owners should exclude cart, checkout, and account pages from caching. This ensures customers always see accurate cart contents and account information.
Not necessarily. Many managed WordPress hosting providers offer server-level caching and optimization features. Before installing additional caching plugins, verify whether your hosting environment already provides similar functionality.
You can compare performance before and after optimization using tools such as Google PageSpeed Insights, GTmetrix, and WebPageTest. Pay attention to metrics like Largest Contentful Paint (LCP), First Contentful Paint (FCP), and overall page load time.