Optimization / Monday June 1, 2026
Simple Cache WordPress Plugin: Review & Setup Guide
Simple Cache is a lightweight WordPress caching plugin that can significantly improve website loading speed with almost no configuration required. If you’re looking for an easy way to speed up your WordPress website without dealing with dozens of advanced settings, Simple Cache may be worth considering.
In this guide, we’ll explain how Simple Cache works, walk through the installation and configuration process, review its key features, and compare performance results before and after enabling the plugin so you can determine whether it’s the right caching solution for your WordPress website.
Update: As of June 2026, the Simple Cache plugin currently shows a WordPress.org warning that it has not been tested with the latest three major WordPress releases. Before installing it on a production site, test it on a staging environment or consider a maintained caching alternative.
Simple Cache Overview
Simple Cache is a WordPress caching plugin designed for users who want to improve website speed without spending time on complicated setup options. Its main advantage is simplicity: instead of overwhelming users with advanced settings, the plugin focuses on enabling basic page caching quickly and easily.
The plugin was created by Taylor Lovett with the goal of making WordPress performance optimization more accessible to beginners. Once enabled, Simple Cache can generate cached versions of your pages, helping reduce server processing time and improve page load speed for visitors.
For users who need more control, Simple Cache also includes advanced options such as excluding specific URLs from caching and using object caching through Memcached or Redis, provided these services are available on the server.
Because of its minimal setup process, Simple Cache can be a practical option for small WordPress websites, blogs, and users who want a straightforward caching solution without managing a complex optimization plugin.
Key Features
- Simple one-click cache activation
- Static page caching for faster load times
- Adjustable cache expiration settings
- Optional Gzip compression support
- URL exclusion rules for specific pages
- Redis and Memcached object cache integration
- Lightweight interface with minimal configuration
- Beginner-friendly setup process
Is Simple Cache Still Recommended?
Simple Cache is still available in the WordPress plugin directory, but WordPress.org currently warns that it has not been tested with the latest three major WordPress releases. While the plugin remains appealing due to its simplicity and minimal configuration requirements, website owners should exercise caution before deploying it on a production website.
If you are considering using Simple Cache, it is strongly recommended to test it first in a staging environment to ensure compatibility with your WordPress version, active theme, and installed plugins. This is particularly important for websites running newer WordPress releases, where untested plugins may introduce unexpected functionality or performance issues.
For users seeking a straightforward caching solution, Simple Cache can still be worth evaluating, but it is advisable to verify that it meets your performance and compatibility requirements before enabling it on a live website.
How to Install the Simple Cache Plugin
The plugin’s installation is done in the same manner as most of the plugins are installed – through the WordPress Administrative Area!
Once logged in, you need to navigate through the left-hand menu to Plugins > Add New. This action will redirect you to the plugin installation page where you can use the search tool and enter “Simple Cache” into the intended field.

As soon as the result is presented, you need to press the “Install Now” button and then “Activate” to enable it on your site.
Optimal Simple Cache Configuration Settings
To view the configuration options for the Simple Cache plugin, please navigate to Settings> Simple Cache.
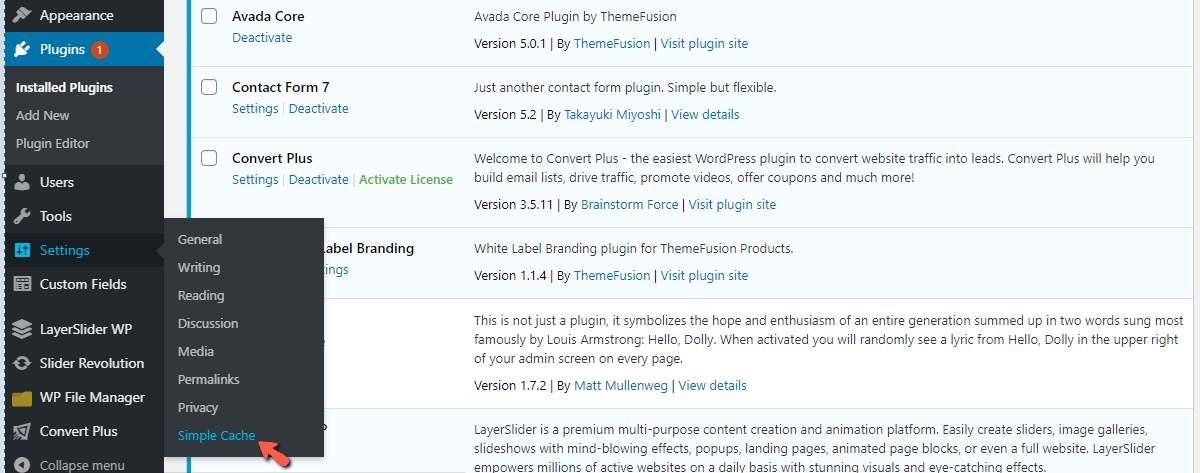
If you have ever used another WordPress caching plugin, you will be surprised by the fewer options you will find under the configuration page.
This plugin does its job well without any need to adjust its settings, and this is what makes it so great. We will briefly discuss the settings and cover all the options you have there, despite them being so few.

- Enable Caching – Please use this drop-down to enable or disable the cache. By default, it is DISABLED, so if you want to take advantage, please go ahead and activate it. There is a handy button above this drop-down called “Turn On Cache”, which you need to click.
- Expire the cache after – Use this option to set the expiry time for the cache. The default setting is 24 hours, and this is great if your website does not receive regular updates. You may reduce it based on the consistency with which you add content.
- Enable Compression – This setting is awesome if your server does not have Gzip compression enabled by default. If you use HostArmada, you do not need to enable it, as Gzip is activated for all our users by default!
- Enable Advanced Mode – Using this drop-down, you will be able to activate the plugin’s advanced mode, unveiling a few additional options. We will cover them below.

- Exception URL(s) – In this content box, you can add URLs that you want to exclude from the cache. If there are multiple URLs, please add them on separate lines. If you wish to use Regular Expressions, you can enable this option from the drop-down underneath the content box.
- Enable In-Memory Object Caching – When you set this drop-down to “Yes”, this will let you choose an object caching service. The options available are Memcached or Redis. Note that these services must be enabled on a server level. Otherwise, you will not see this option active. If you are hosting your website on HostArmada’s Speed Reaper plan, Memcached will be available at your disposal.
- In Memory Cache – This drop-down will become available once the above is activated. Choose the object caching system that is available on your server.
There you have it, all the configurations for this plugin. Hopefully, you are not prejudiced by the lack of configuration settings. At least not before you see the results, which are coming up next!
Before Simple Cache Optimization Test
Now comes the part we believe you are most interested in – the tests! Before any plugin optimizations, the result is not that spectacular.
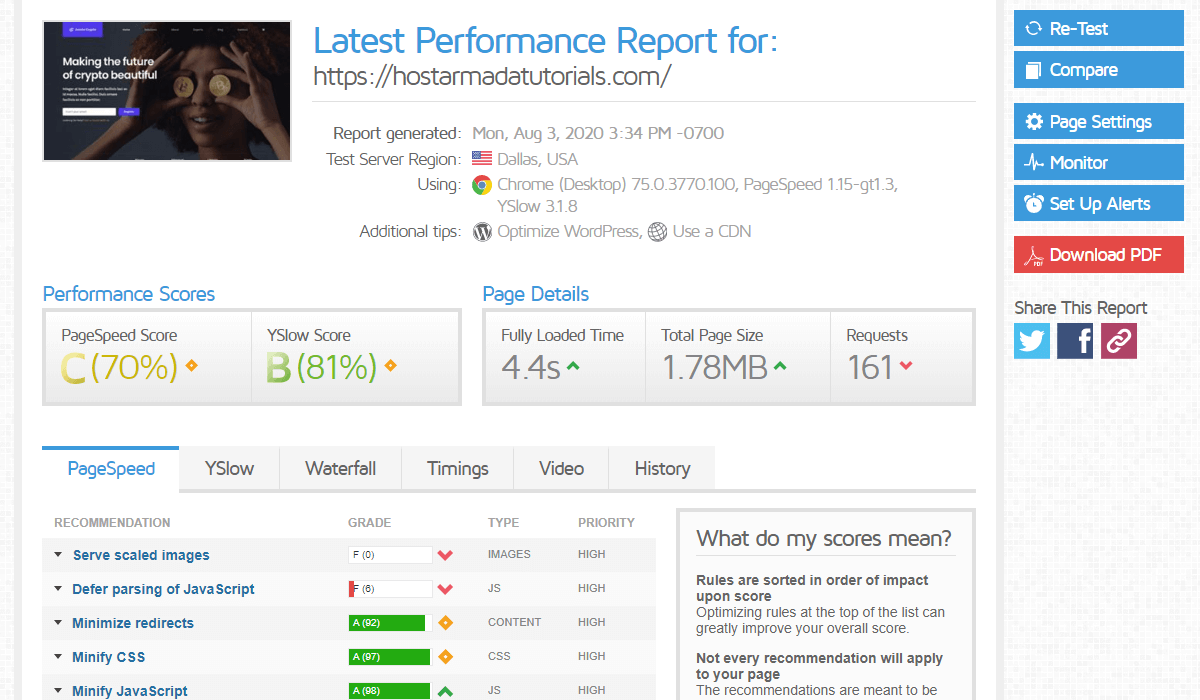
The loading speed stands at about 4 seconds, and the scores are quite decent.
After Simple Cache Optimization Test
After the plugin was enabled, you can see that the difference in the page load time was cut down by half, and the TTFB went down from 600 milliseconds to about 100 milliseconds!

You may say, “But that is not that impressive, and the score remains the same!”. Do not forget that this plugin was installed and activated. That’s it. Nothing more. Considering how easy it was to set up, the performance you get is truly amazing. We are sure that many people can be pleased with it, without going through the hassle of setting up a complex caching plugin with an overwhelming amount of configurations.
Simple Cache Alternatives
Although Simple Cache offers an easy way to improve website performance, it is not the only option available. If your hosting environment supports LiteSpeed Web Server, LiteSpeed Cache is a more actively maintained alternative that provides a broader set of optimization features.
LiteSpeed Cache includes page caching, browser caching, CDN integration, image optimization, database cleanup tools, and advanced performance settings that can help improve Core Web Vitals and overall website speed. It also receives regular updates and ongoing compatibility improvements, making it a strong choice for modern WordPress websites.
For users who want greater control over caching and performance optimization while maintaining compatibility with current WordPress releases, LiteSpeed Cache is worth considering as an alternative to Simple Cache.
Final Thoughts
Simple Cache demonstrates that improving WordPress performance does not always require a complex setup. With its straightforward approach to page caching, it can help reduce load times and improve server response times with minimal effort, making it a practical option for beginners and website owners who prefer simplicity over extensive customization.
That said, caching is only one piece of the performance puzzle. Your hosting environment, server configuration, CDN setup, image optimization, and website architecture all play an important role in delivering a fast user experience.
If you’re looking to maximize WordPress performance, choosing a hosting provider that includes speed-focused technologies such as NVMe storage, server-level caching, CDN integration, and optimized WordPress infrastructure can make an even bigger difference. HostArmada’s WordPress hosting plans combine these performance enhancements with reliable security and expert support, helping you build a faster and more responsive website from the ground up.
FAQs
Simple Cache is still available in the WordPress plugin directory, but it has not been tested with some of the latest major WordPress releases. Before using it on a production website, it is recommended to test the plugin in a staging environment to verify compatibility with your theme and other plugins.
The performance improvement depends on your website’s size, hosting environment, and existing optimizations. In many cases, enabling page caching can significantly reduce page load times and lower server response times (TTFB), resulting in a faster browsing experience for visitors.
Yes. Simple Cache includes support for object caching through Redis and Memcached when these services are available on the hosting server. This can further improve performance by reducing database queries and server processing time.
Simple Cache is designed for simplicity and ease of use, while LiteSpeed Cache offers a much broader range of optimization features, including image optimization, CDN integration, browser caching, database optimization, and Core Web Vitals improvements. For users who want advanced performance controls and active development, LiteSpeed Cache is generally the better choice.