WordPress / Sunday June 7, 2026
WP-Rocket Configuration Guide: Optimize WordPress Speed
WP-Rocket is a premium WordPress caching plugin that helps speed up your website by reducing page load times, improving Core Web Vitals, and optimizing how content is delivered to visitors.
If you’re looking for an easy way to improve WordPress performance without complex configuration, WP-Rocket combines page caching, file optimization, lazy loading, database cleanup, and preload features in a single plugin. These tools can help improve user experience, search engine visibility, and conversion rates while reducing server load.
Plugin Overview
We doubt there is anyone in the WordPress community who has not heard of WP-Rocket. It was introduced around seven years ago and was recommended by WordPress gurus a year after its release. The plugin’s developers had a vision of bringing everything a WordPress user needs without overwhelming them with an overwhelming list of configurations and requiring manual tweaks to start seeing results. In this post, we are going to check how well it performs and whether it is worth the price!
The plugin developers claim that 80% of the best performance practices are set by default upon plugin activation. Given its popularity, we are excited to put this statement to the test! If you are a maximalist and would like to push this even further, this post offers thoughts and recommendations on this plugin’s settings that we believe may give you the extra bit of performance you need!
To show WP-Rocket’s capabilities in a more objective manner, we have performed a test using a theme deployed by Avada, which is very similar to fleshed-out production websites.
How To Install
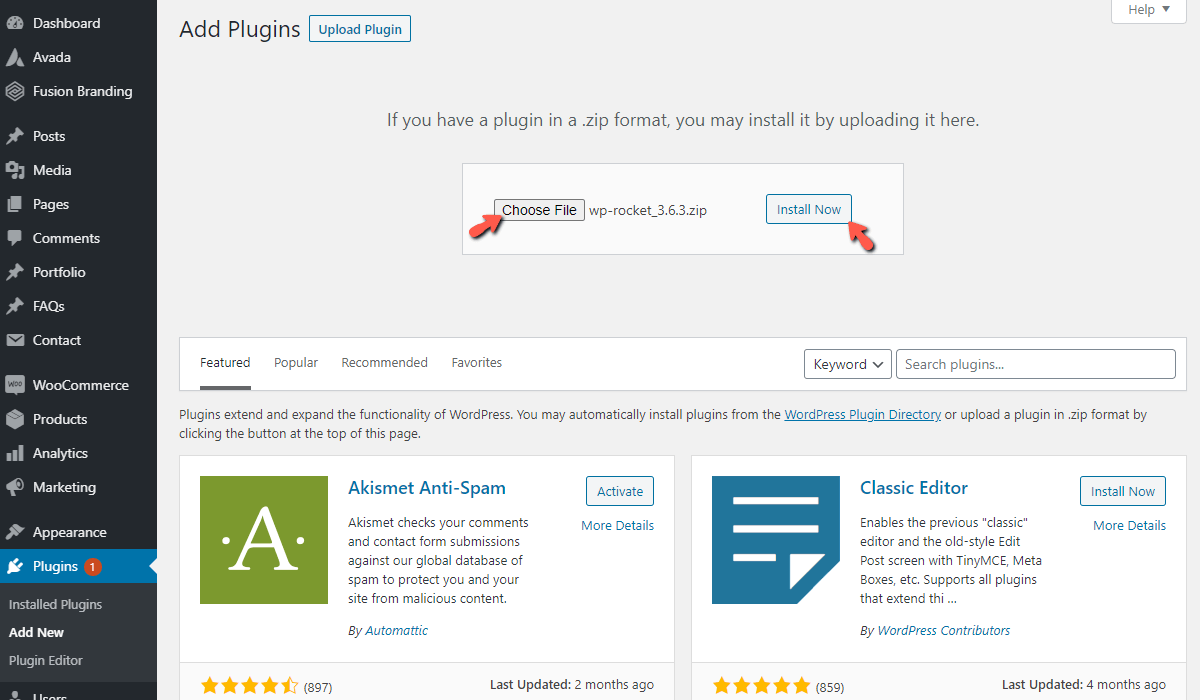
As this is a premium WordPress caching solution, it is licensed, and before you can proceed with the installation, you need to purchase it from WP-Rocket’s official website. Upon successful purchase, you will see a download link inside your WP-Rocket dashboard. After downloading the archive, go to your WordPress Admin Dashboard and then go to Plugins > Add New > Upload Plugin.

Lastly, click the “Choose File” button and select the wp-rocket.zip file from your local computer. This action will cause the “Install Now” button to appear, and upon pressing it, the installation will begin!
After a brief loading period, you will see a summary of the installation process and can activate the plugin by pressing the “Activate Plugin” button.
Configuration Options
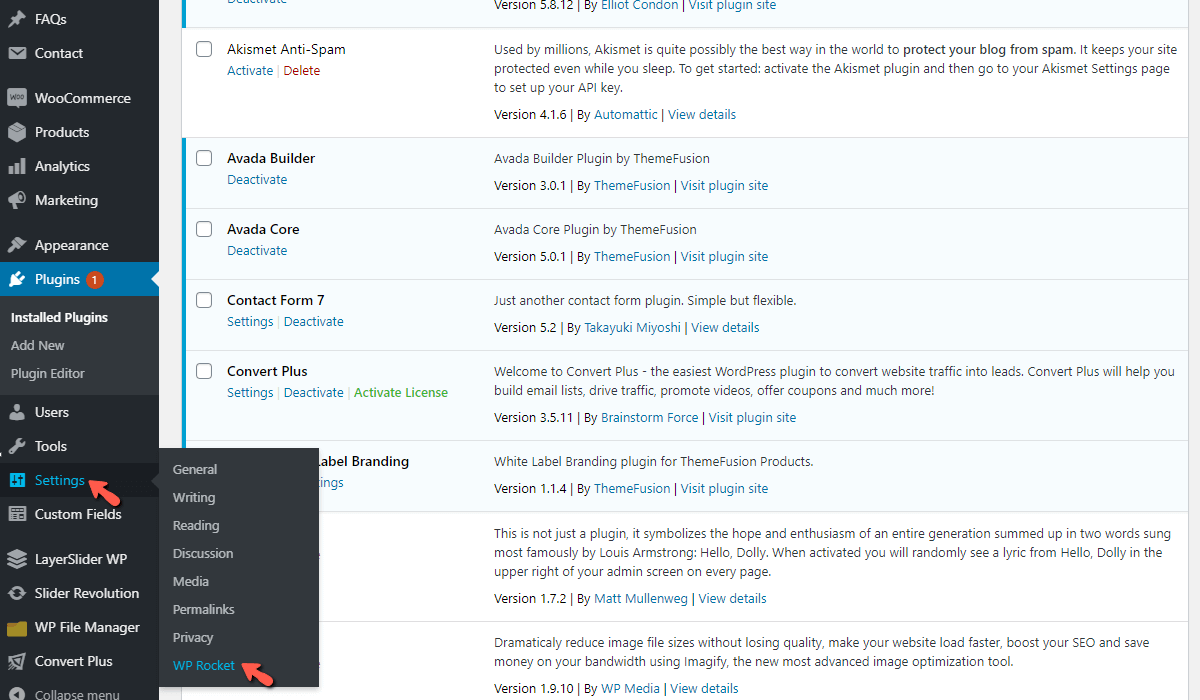
Now that you have installed the plugin, let’s go and check out its configuration options. To access them, go to Settings > WP Rocket.
Clicking on this link will redirect you to the settings page, where you will most likely be shocked by the 13 available tabs! Do not worry, as everything is laid out for you in a user-friendly, understandable manner, and most options will provide a warning or a tooltip explaining what they do. Furthermore, this post aims to cover all relevant settings that affect performance, explain them, and provide recommendations on what to enable and when. So, rest assured!

The first tab we will cover is the “Dashboard” tab. You will see your license, expiration date, and your account status below it. In addition, you will find useful buttons, links to “getting started” articles, and FAQs.
Dashboard
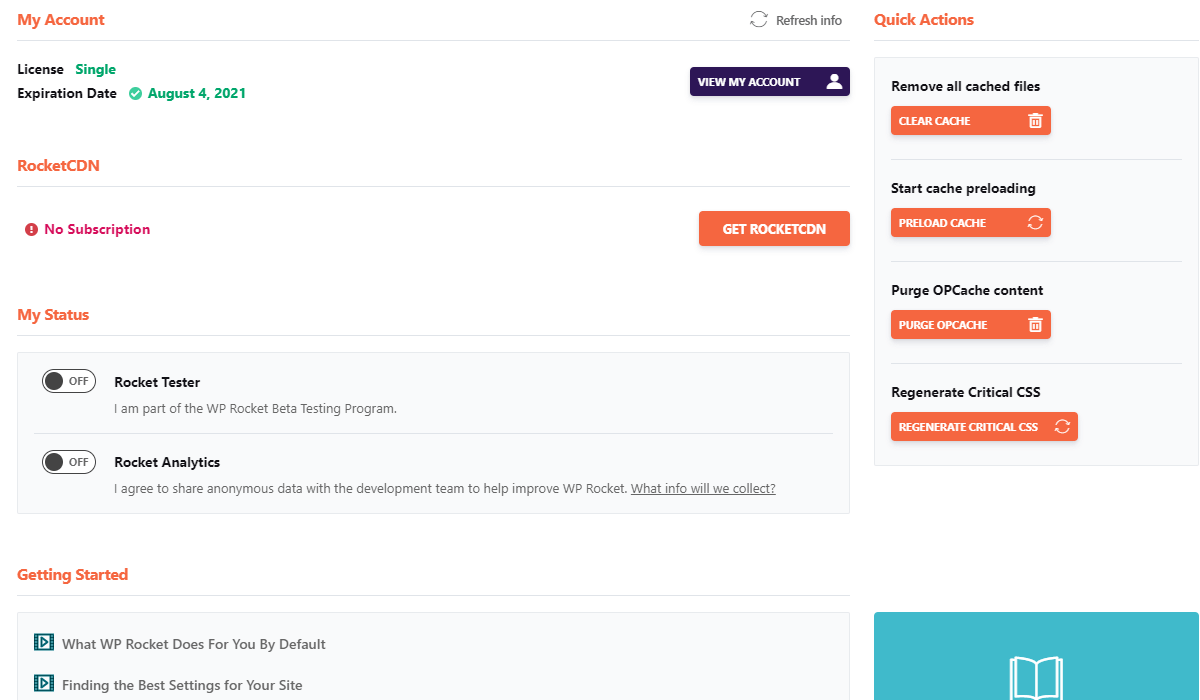
- Clear Cache – Pressing this button will clear all the cache files generated by WP-Rocket. We advise you to flush the cache each time you change a plugin setting.
- Preload Cache – Preloading allows WP-Rocket to generate cached versions of your pages so that visitors can access them faster. The plugin deploys with this feature enabled by default and immediately starts preloading the cache upon activation. If you want WP-Rocket to start preloading, please press this button. This feature is excellent to use immediately after a cache flush.
- Purge Opcache – When you execute a PHP script (for example, access your website) and the opcache PHP extension is enabled, the code is compiled into opcodes that the server can understand. This code is stored in memory and reused on each subsequent visit, making your website much faster in the process. You may use this button to clear this cache.
- Regenerate Critical CSS – When you visit a website, the first thing you see is the upper area of the site, commonly referred to as the “above-the-fold” content. This content is critical for your website: it is the first thing visitors will see, needs to make an impression, and, most importantly, must load quickly to improve UX. The CSS within the “above-the-fold” area of the site is the Critical CSS (CCSS). Getting it to load inline with the rest of your scripts can improve your page’s load time and remove the “Eliminate Render-Blocking Resources” error on popular web performance testing sites, such as GTmetrix and Pingdom. Clicking on this button will generate this CSS anew and inline it with the rest of your scripts.
- Get RocketCDN – If you press this button, you will be redirected to the “CDN” tab to set up WP-Rocket’s CDN – RocketCDN. It is entirely optional, and if you do not want to use it, you can use a different one, such as Cloudflare or KeyCDN.
Cache
This tab will let you disable/enable the cache, add caching for logged-in users, and define the cache lifespan.

- Enable Caching for mobile devices – This option is enabled by default, and it allows caching for mobile devices.
- Separate cache files for mobile devices – Unless your website does not have a responsive theme and uses a different view for mobile devices, do not check this option.
- Enable caching for logged-in WordPress users – This is an excellent option if you have many clients who regularly browse your website while logged in, or if you have user-only content that is not available to visitors unless they log in.
- Cache Lifespan – This is the time after which WP-Rocket will clear the global cache. If you are doing regular website updates, you may want to lower this to a few hours. If your website is fully built and you do not expect to add content anytime soon, you can increase it to 24 hours. Additionally, after flushing the global cache within the designated time frame, the plugin will preload the cache if that option is enabled.
File Optimization
Under this tab, you will find optimization options for HTML, CSS, and JavaScript files.
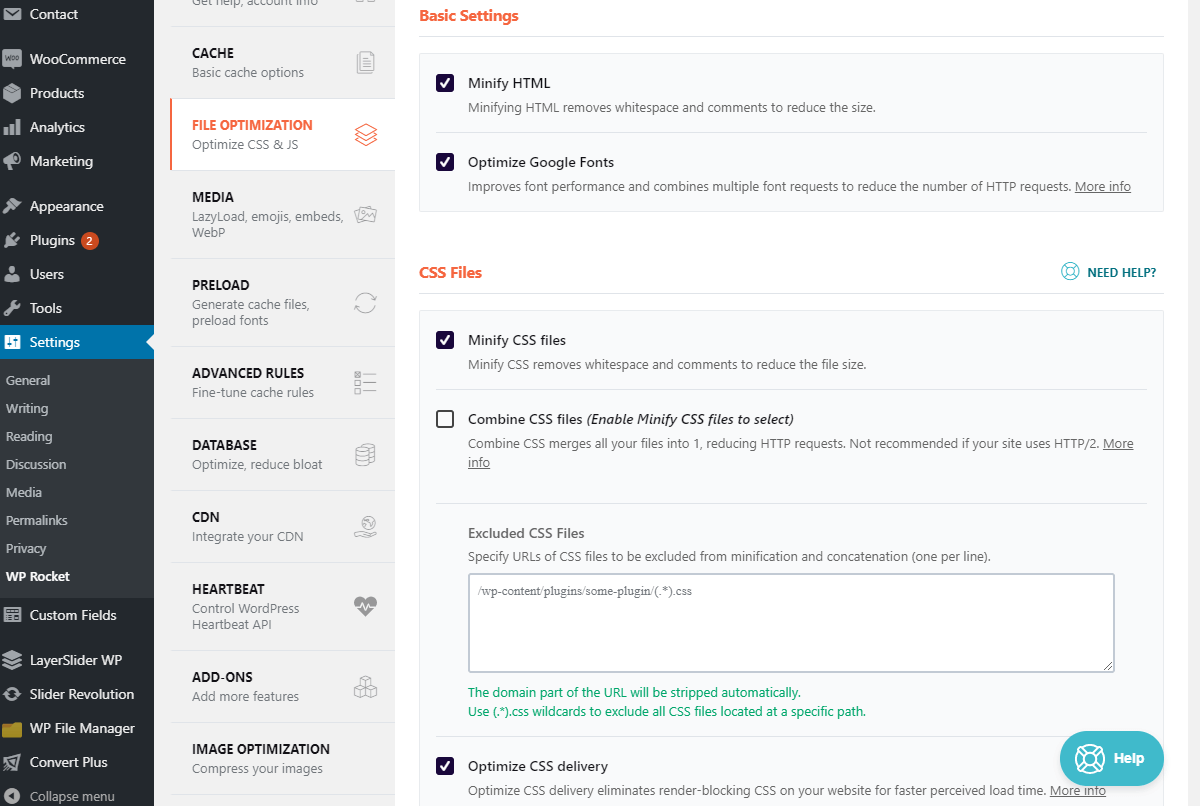
- Minify HTML – Check this box to optimize your HTML files by removing unnecessary characters. This option reduces their size and boosts the loading speed of your pages.
- Optimize Google Fonts – This is an excellent option if your site utilizes Google Fonts heavily. It will combine all requests to fonts.static.com into a single request and add the “preconnect” resource hint to preload the font domain’s DNS zone. Finally, it will also add the display=swap parameter to your HTTP request, making your text load along with the font. You should enable this if you have a text on your pages that you want your visitors to read immediately – for instance, if you have a webshop and have an ad campaign going.
- Minify CSS files – This is a risky option that may not work well on all websites. It removes unnecessary characters from your CSS files, making them smaller. Thus, they are delivered quickly to the visitor’s browser. Typically, this option contributed more to the actual page score than speed, and we believe that it is worth activating it when your website uses A LOT of CSS. The performance benefits would be more distinguishable.
- Combine CSS files – We strongly advise you to avoid this setting, as it often causes FAUC (Flash of Unstyled Content) issues on sites. You may have faced this before when you saw a page’s text displayed in an unstyled manner, and after a few seconds (or even minutes), all the styles appeared. If you host your websites with HostArmada, you have an even stronger incentive to keep it disabled. We offer HTTP/2 (Start Dock, Web Warp) and HTTP/3 (Speed Reaper), which means that resources are loaded simultaneously, and having all your CSS bunched up in a single file will not bring you any performance. It will increase your page score; however, is it worth ruining your visitors’ UX by unstyled text appearing when they visit your website?

- Remove jQuery Migrate – If you activate this option, this will stop the file “wp-includes/js/jquery/jquery-migrate.min.js” from being loaded on your site. This script is outdated and was used by themes and plugins before WordPress 3.6. In 99% of the cases, this should be completely fine to activate; however, if you see any issues with your plugins and themes, you should disable it.
- Minify JavaScript Files – The same goes for this option as with “Minify CSS files” discussed above. Typically, the performance gain would be much more significant if there are a lot of JavaScript files on your site. Activate it to test how your WordPress website behaves with it, and if you find any issues, deactivate it.
- Combine JavaScript files – Analogous to the mentioned above “Combine CSS Files”. It could work for you as combining the JavaScript files will make them load along with the rest of any third-party and inline scripts, reducing requests and consequently – load speed. Not necessary when using a server utilizing HTTP/2 or HTTP/3.
- Load JavaScript deferred – If you care about page score in performance testing sites such as Gtmetrix, Pingdom, and GooglePageSpeed Insight, you can remove the “Eliminate render-blocking resources” or “Defer parsing of JavaScript”. It will not bring any speed-enhancing benefits.
- Safe Mode for jQuery (recommended) – This option will only show if you activate the above. We recommend enabling this to make sure inline jQuery requests from your themes and plugins will load at the top of the document as render-blocking scripts. Sometimes it is impossible to avoid render-blocking scenarios without breaking your website’s functionality.
Media
Under this tab, you can activate Lazyload, control emojis, embeds, and WebP support.
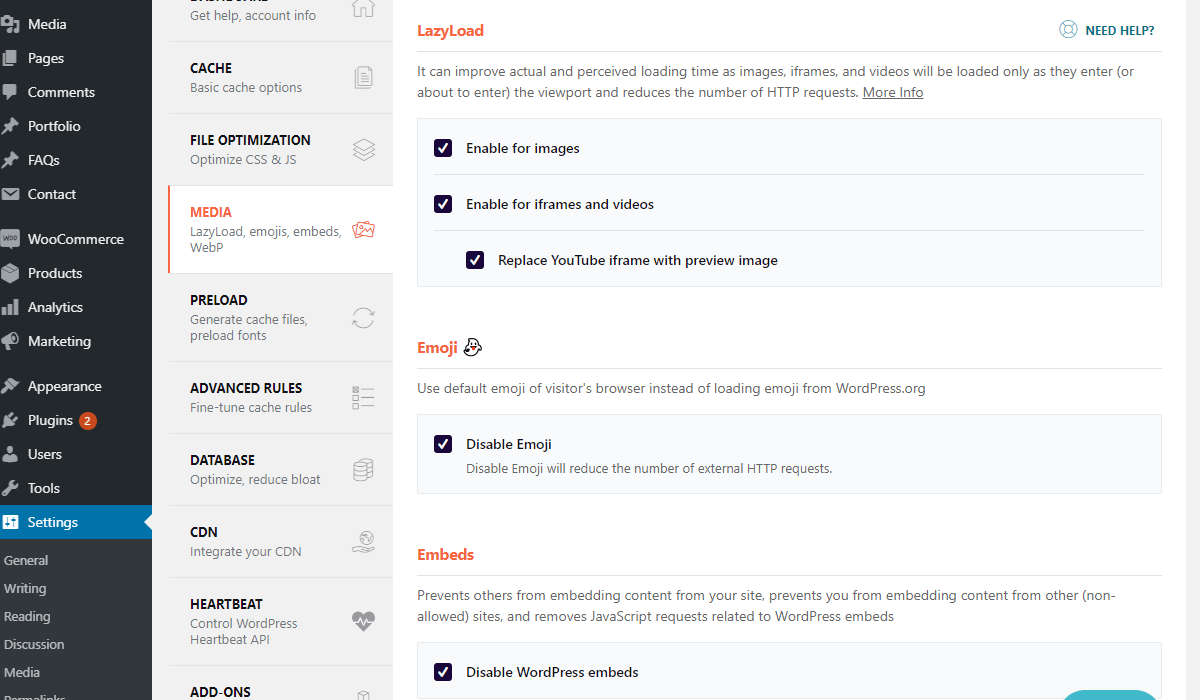
- Enable for Images – Lazyload is a technique that makes your images load gradually as you scroll down your page, rather than all loading at once. This option is excellent if you have a lot of images and most of them are in the “below the fold” area of the website.
- Enable for iframes and videos: You can use this option if you have many videos. It applies the Lazyload tech to them as well.
- Replace YouTube iframes with preview images – Activating this option will replace all your YouTube embeds with preview images, which should improve page load speed if you have many iframes on your pages.
- Disable Emoji – When you activate this, you will disable the emojis shipped with the WordPress core. Instead, users will use the ones provided by their browser. It reduces the number of requests per page and will result in a better score.
- Disable WordPress embeds – a great way to prevent others from embedding your content on their sites. In addition, it will stop JavaScript requests related to WordPress embeds.

- Enable WebP caching – WebP provides both lossless and lossy compression for your images, resulting in smaller file sizes, thereby speeding delivery to the user’s browser and increasing your website’s loading speed. If your WordPress has images in the WebP format, you can also enable this to cache them. To have WebP images, they first need to be converted, and unfortunately, WP-Rocket cannot do this. You can use other WordPress plugins, such as Imagify or Shortpixel.
Preload
The settings tab lets you configure a preload rotation for your WP-Rocket cache.
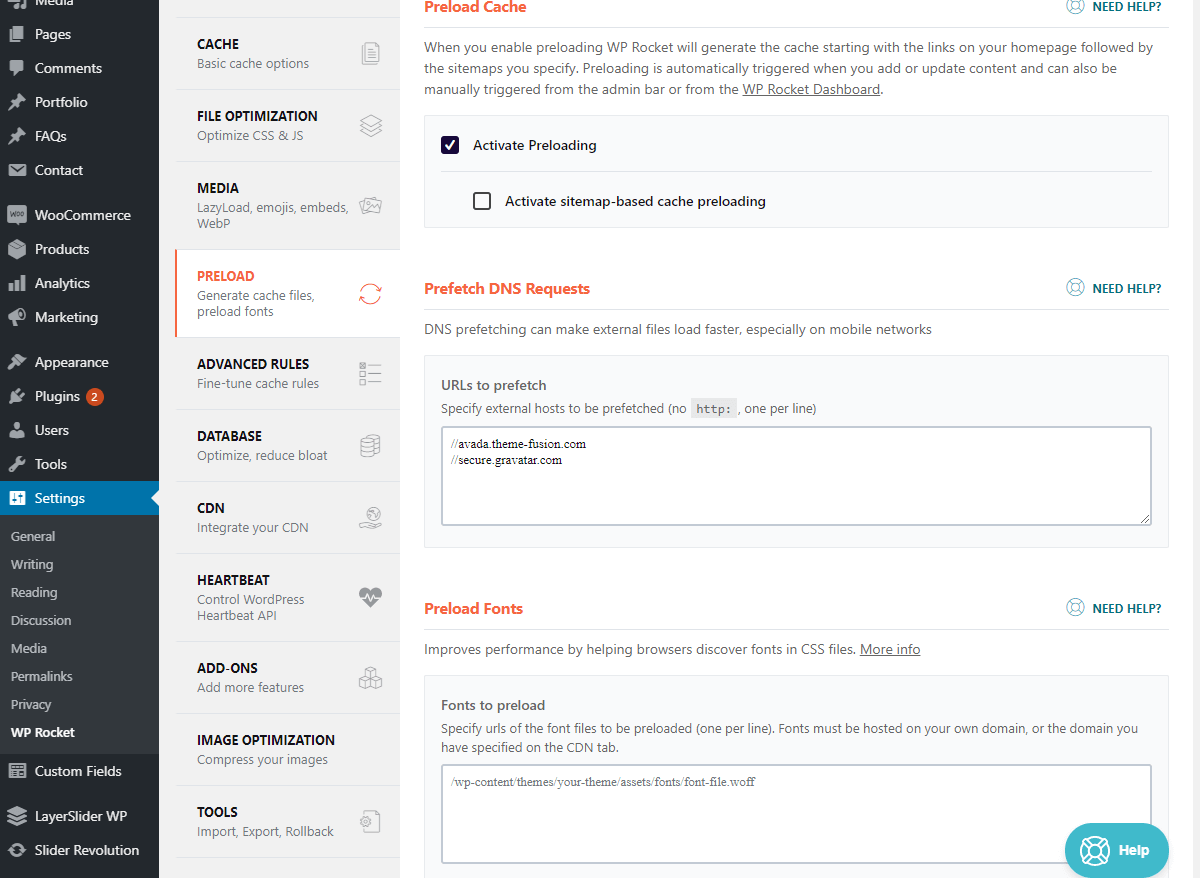
- Activate Preloading – Enable the WP-Rocket plugin’s preloading functionality, which will preload the cache after a cache wipe or when adding/changing content on your site. It is great if you regularly add content to your website, ensuring it is cached.
- Activate sitemap-based cache preloading – This option will be available only if the previous option is enabled. It will allow you to add a link to a custom sitemap that the plugin will use to preload. If you do not have such a sitemap, but instead you have one generated from a popular SEO plugin such as Yoast, this will fetch the sitemap from there and build the cache from it.
- Prefetch DNS requests – Enabling this option lets you prefetch DNS records for third-party sites, allowing the browser to connect to remote domains preemptively. Typically, you are loading various content from these sites, which increases the time required to load the resources. To find third-party domains, open Google Chrome and press “F12”. When the console appears, please choose “Sources” from the top menu. On the left side, you will see a list of pages, with your domain being on top and all the external ones listed underneath. To “prefetch” these domains, please insert them into this text field, with one on each line. If you are not a Google Chrome user, that is completely fine; any up-to-date web browser should have the same functionality, accessible in a similar manner.
- Preload fonts – This is a great option to enable when you have many fonts loaded from specific CSS files. Inside the content box, simply add the path to the file containing the font URL so you can take advantage of this (one per line).
Advanced Rules
You may use the configuration options on this tab to set rules for caching specific pages you do not want cached.
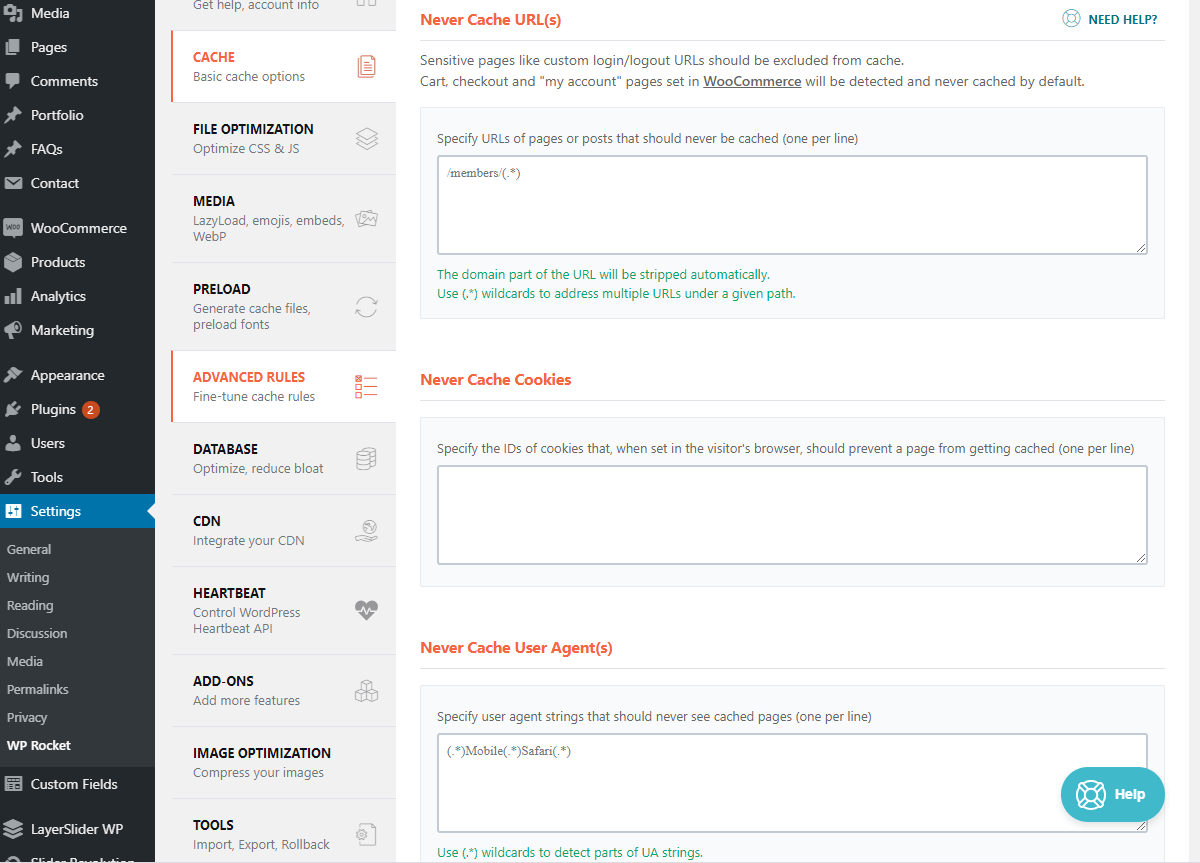
- Never Cache URL(s) – Inside this content box, you can specify URLs that you want WP-Rocket to exclude from being cached. Really useful for login/registration/contact forms. If you are using WooCommerce, the shopping carts and checkout pages will be removed from the cache by default.
- Never Cache Cookies – You may use this content box and define cookie IDs to exclude from the cache. This option is excellent if you run into an issue with conflicting plugins that need to prevent caching of the cookies they use.
- Never Cache User Agent(s) – Include the user-agents you wish to prevent from seeing cached versions of your pages. This setting can be useful if you notice that your site’s layout appears broken on specific browsers or devices.

- Always Purge URL(s) – Inside this content box, enter the URLs you need to be cleared from the cache when you update your posts or pages.
- Cache Query String(s) – Inside this content box, you can enter Query Strings that you want WP-Rocket to cache.
Database
The functionalities under this tab will allow you to optimize your database from your WordPress dashboard.

- Post cleanup – By default, WordPress stores a copy of your drafts or posts inside the database while you are writing them, in case you get disconnected or any other issue occurs. This feature guarantees that you do not need to start writing everything all over again; instead, you can resume from where you were last interrupted. Tick the boxes here to make WP-Rocket clear those when you finally hit the “Save Changes And Optimize” button.
- Comments Cleanup – Trashed and Spam comments are typically kept within the WordPress database as well. If there are a lot of them, this can cause its size to rise. Tick the boxes here to make WP-Rocket clear those when you finally hit the “Save Changes And Optimize” button.

- Transients Cleanup – Transients are temporary data stored in your database for a fixed period and then cleared. Plugins or themes usually generate this, and if you are using a lot of them, this can go out of control and grow your database. Clean this up regularly to avoid overpopulated transient tables. Tick the boxes here to make WP-Rocket clear those when you finally hit the “Save Changes And Optimize” button.
- Database Cleanup – This performs a database optimization that reduces overhead inside the tables. This optimization can be done from a few places, but WP-Rocket integrated it within its interface, making it convenient to use. Tick the box here to make WP-Rocket clear the overhead when you finally hit the “Save Changes And Optimize” button.
- Automatic Cleanup – You can optimize the above process to run Daily, Weekly, or Monthly. We recommend not doing this and doing it manually when you feel it is necessary.
- Save Changes and Optimize – When you have selected your options from the page, hit this button so that WP-Rocket can work its magic!
CDN
When using a CDN, the settings under this tab will help you integrate it with WP-Rocket and your WordPress.
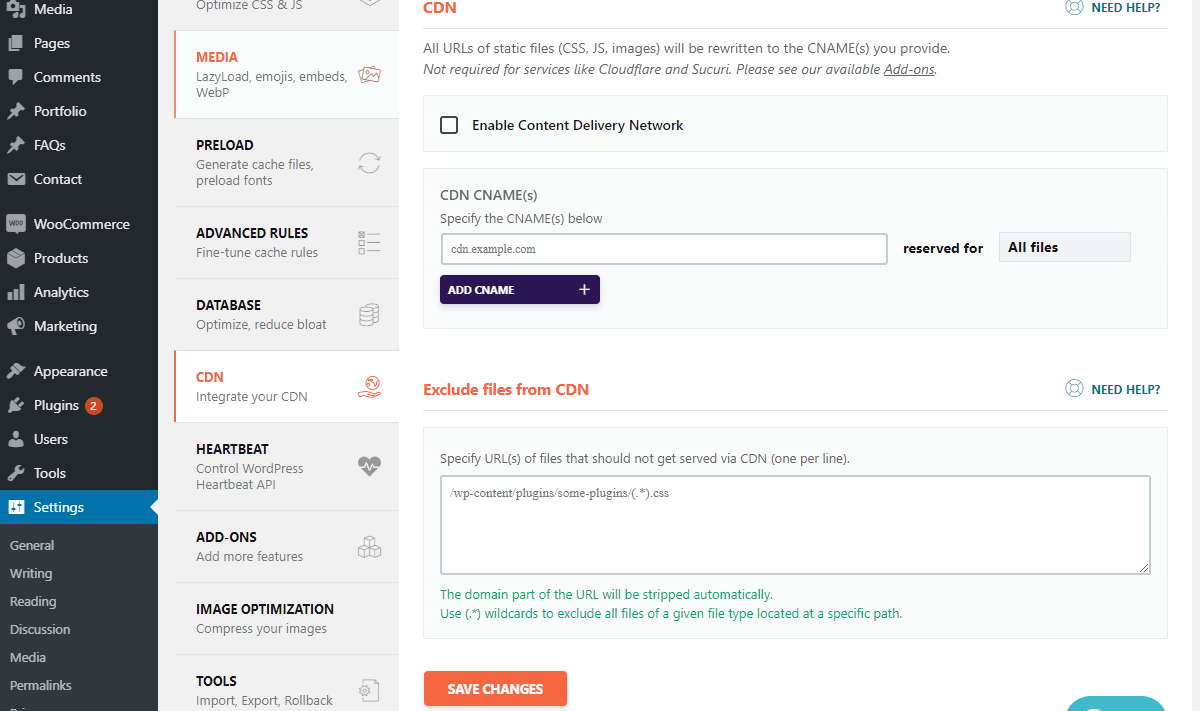
- Enable Content Delivery Network – If you are using proxy-based CDN providers such as Cloudflare or Sucurri, you do not need to activate this. When you use their services, you can tweak all of these settings from their dashboards.
- CDN NAME(s) – If you are using a CDN provider that serves your static content from a URL, you can add it here. You can also select the types of files you want for it. For instance, you can add 2 URLs, one for Images and one for JavaScript and CSS files.
- ADD CNAME – Use this button to add more CNAME URLs.
- Exclude files from CDN – Inside this content box, you can include data that you wish to exclude from the CDN.
Heartbeat
The Heartbeat API enables WordPress to receive near-instantaneous front-end or back-end updates. Sometimes this API can be taxing on server resources; thus, the settings under this tab can help you control it.

- Control Heartbeat – Enable this checkbox to use the heartbeat control functionality in WP-Rocket. Note that this is an issue you may not face on your site, and make sure heartbeat is causing problems before enabling it. An indication of this is if your WordPress seems to be spawning many processes triggered by the admin-ajax.php file.
- Behavior in the backend – You should play around with this option to see what gives you the best results. You can leave it at the default “Reduce activity” level, but if it does not help, simply choose “Disable”.
- Behavior in the post editor – You should play around with this option to see what gives you the best results. You can leave it at the default “Reduce activity” level, but if it does not help, simply choose “Disable”.
- Behavior in the frontend – You should play around with this option to see what gives you the best results. You can leave it at the default “Reduce activity” level, but if it does not help, simply choose “Disable”.
Image Optimization
This tab contains only a button to help you install “Imagify”. It is a great solution that can help you optimize your images and boost your site’s speed. Note that using Imagify is not mandatory. We have made a great post on how you can use other optimization tools for your images here.
Before Optimization Test
Finally, it is time for the exciting part. After installing the plugin and applying the recommendation, what will the performance benefits be? Well, here is a test before installing WP-Rocket.
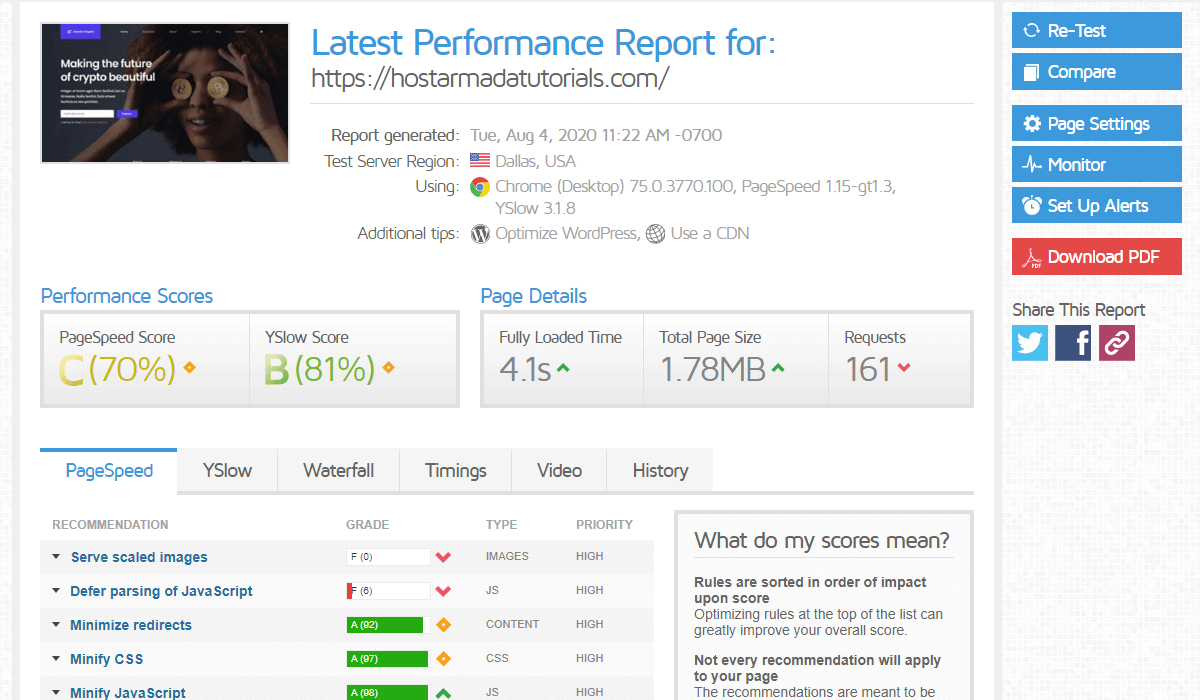
A reasonably decent result with scores varying between 70-80%, load speed of 4 seconds, and TTFB sitting at about 650 milliseconds.
After Optimization Test
Now, the picture looks very different after installing the plugin and making some tweaks.
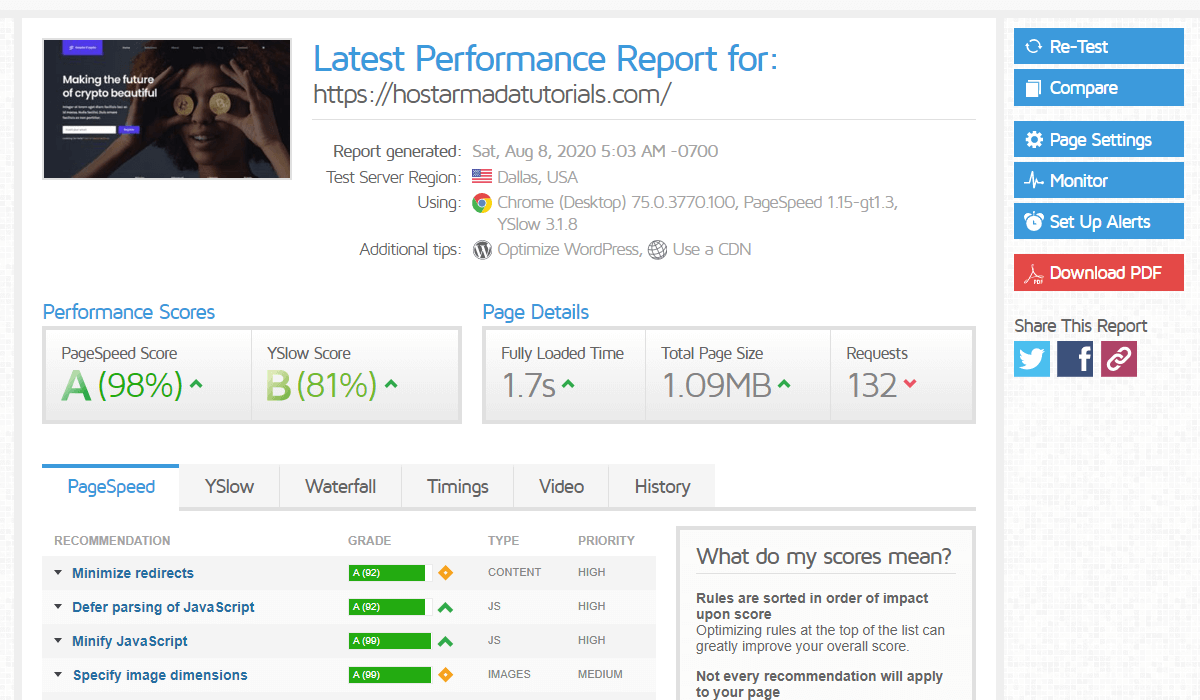
The loading speed has improved to almost 3 times, currently at 1.7 seconds. The number of requests and the total page size are lower as well, and the TTFB dropped to about 100 milliseconds!
Final Words
We are sure that results speak for themselves what a great addition WP-Rocket can be to your performance arsenal. The only downside is that it is a paid plugin, and some may argue you can get the same results with a free plugin. Note that this may be true; however, fine-tuning every aspect of the free plugin can be quite time-consuming and confusing, whereas WP-Rocket takes matters into its own hands!
As a Web Hosting Provider that offers fully managed WordPress solutions, we at HostArmada have always been, and will always be, focused on delivering top-notch performance and fast load times to our customers. If you are still looking for a home for your new website or you are unsatisfied with your current host and expect nothing less than excellence, we would like to welcome you to take a look at the following comprehensive review of our hosting plans.
FAQs
Yes. WP-Rocket remains one of the most popular premium WordPress performance plugins thanks to its ease of use, strong caching features, and Core Web Vitals optimization tools.
WP-Rocket can significantly improve PageSpeed Insights scores by reducing page load times, optimizing CSS and JavaScript delivery, enabling caching, and improving user experience metrics.
In most cases, yes. WP-Rocket includes page caching, browser caching, lazy loading, database optimization, and file optimization features that reduce the need for multiple performance plugins.
Yes. WP-Rocket integrates with Cloudflare and can help improve website performance by combining caching, content delivery, and optimization features.