
Learn Drupal 8
Blocks are an essential part of managing content in Drupal as they determine the layouts of website pages. You can think of a block as a box containing specific website content. By using blocks you will be managing the positioning of your content and place it in the desired spots. With blocks, you will be able to modify the shape, size, and position of your content and control on which pages exactly it will be appearing.
If you have accessed your website while logged in to your Drupal Admin account, you have most surely noticed that a pencil icon containing a "Configure block" option appears next to each section.

Even if you are new to the concept of blocks, you can put your mind at ease as they are really intuitive and you will get used to working with them in no time. Now, if you are ready, let's get moving.
In order to begin, please log in to your Drupal Admin Dashboard and navigate through the Administration toolbar to Manage > Structure.
Once you are located on the "Structure" page, please click on the first "Block layout" link.

When you are redirected to the "Block layout" page you will notice it consists of two main tabs:

We will start with an overview of the "Block layout" tab so you can have a better idea of the whole Block concept and structure.
First off, we would like to introduce one term in order to ensure you understand everything that will be explained in the following lines.
At the top of the "Block layout" page, you will see a list of all currently installed themes, separated under sub-tabs. Right beneath each of them, there will be a "Demonstrate block regions (Theme Name)" link which will allow you to check all available block regions in the given theme. This is an extremely useful feature you can lay on whenever you are not certain where to put a specific block.

Once clicked, you will be presented with a scheme of your theme indicating each block region by its name

When you are done exploring the block regions, you may click on the "Exit block region demonstration" to go back.
Now, back at the "Block layout" tab, you will see a list of all regions, whether or not a block is placed in them.
You are able to edit any block by clicking on the corresponding "Configure" button in this list. Alternatively, you can always do that from the home page of your website while you are logged in as an administrator (as shown in the first screenshot example in this guide).
For the sake of our tutorial, we will be editing the block displaying the "Powered by Drupal" copyright notice in the footer of the website.

Please bear in mind that the block configuration page where you will be redirected will be slightly different depending on the block you are editing as different blocks carry specific content settings.
In our example, we will review the general settings of each block.
The first thing you will notice is the "Title" field which indicates the name of the block. Beneath it, you will see a "Display title" checkbox that controls whether the given title will be actually displayed on the frontend of your website.
Right below, you will see the "Visibility" table where you will be able to restrict the block to be displayed only for specific content types, on particular pages, or to certain visitors depending on their roles. To do so, you will simply need to tick the corresponding checkboxes.
Following is the "Region" dropdown menu, which, as explained in the previous section, determines the position of the block on your website frontend.

As soon as you perform the intended changes, please do not forget to click on the "Save" button.
In case, you want to remove a given block you can simply click on the "Delete" link.
Let's say you do not want to delete the block but you also do not want it to appear on the website frontend. In such a case, at the "Block layout" page, you can simply click on the arrow icon for the corresponding block and select the "Disable" option.
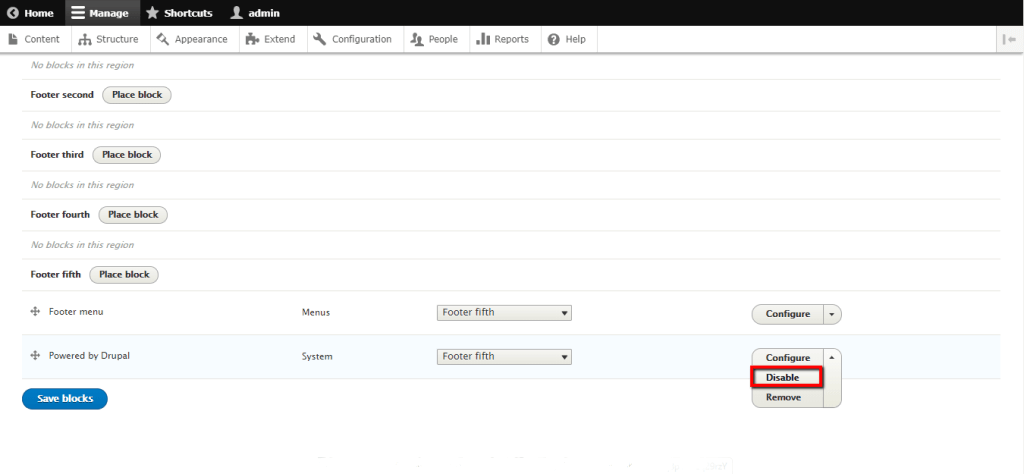
Once this is done, the block will no longer be displayed on your page(s) and will be indicated as "Disabled" in this list. As soon as it is needed again, you will simply need to click on the "Enable" button.
Changing block positions is an extremely simple task. You might need to do that in case you have two or more blocks placed in the same region. You have probably already noticed the Arrow Cross icon in front of each block. By clicking on it you will be able to drag and drop the block to the desired position.

Once this is done, you will notice a tiny asterisk icon next to the moved block. It will also be highlighted in pink. This indicates a change that has not been saved was performed.

In such cases, you always need to click on the "Save blocks" button located at the very bottom of the page.
The last thing we will review in this guide is placing a new block to a region. To do that you will need to click on the "Place block" button next to the corresponding region.

When clicked, you will be presented with a new dialog where you will need to select the block type by clicking on the given "Place block" button

Once the block type is selected you will be presented with the "Configure block" dialog. You should already be familiar with this interface as it is similar to the example we have reviewed while we were editing our block.
You will need to configure the block details and when you are ready to hit the "Save block" button.

When the button is clicked your new block will be automatically saved and available on your website frontend.
With this covered, you should already be able to comfortably maintain the blocks on your Drupal website. We hope the information provided in this tutorial was useful to you and you have managed to easily follow our instructions. In case you have any additional questions on the topic, you are always welcome to address them to our Support Team.

Sebahat is a young and bright woman who has become an invaluable part of our team. She started as a Customer Care Representative, mastering that role and, along the way, growing into a tech-savvy individual who is well acquainted with every support layer of the company. Driven by her aim to improve our customers’ experience constantly, she is committed to enhancing the extraordinary support we deliver.
Learn more about Drupal 8 in the other tutorials that we have: