
Having the ability to change the PHP versions with a single click is really useful, especially if you are hosting multiple websites on your server. The “MultiPHP Manager” feature was introduced as a part of the “EasyApache 4” functionality back in 2016, as prior to that, users were only able to have one PHP version on a WHM based server because the “EasyApache 3” software had limitations in that regard.
The only way you could have different PHP versions was with third-party software such as CloudLinux. In addition to allowing an easy transition between different PHP versions, the “MultipePHP Manager” feature will give you the option of installing PHP FastCGI Process Manager (PHP-FPM) and configuring it on your server. In this tutorial, we will be going through the process of applying different PHP versions and setting up the PHP-FPM service. Let’s get started.
First, you need to log into the WHM service for your VPS or Dedicated Server. If you are not sure how to do that, please check our How to Access WHM tutorial. After you have logged in, please navigate to the search bar on the left side of the page and type “MultiPHP Manager”.
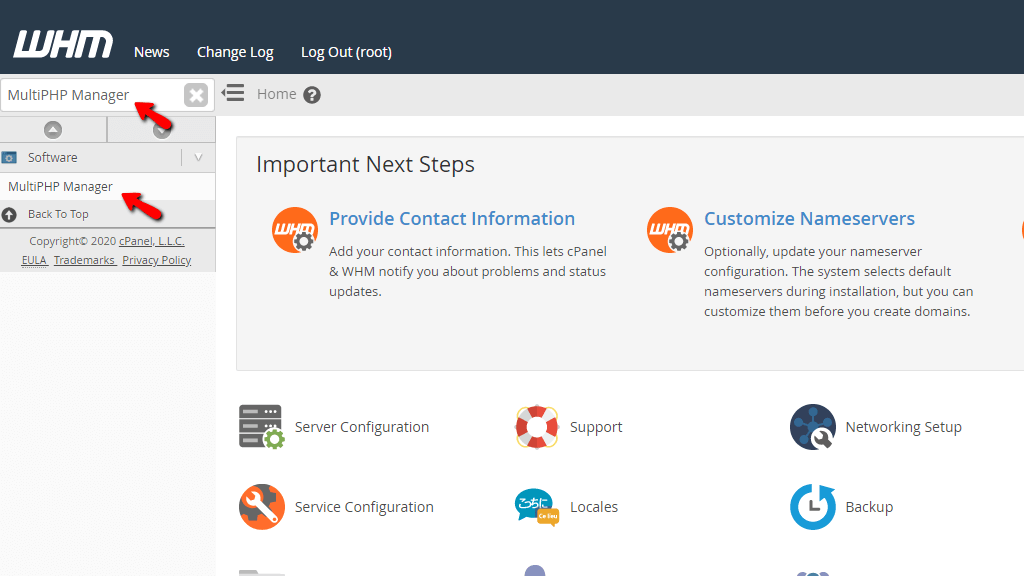
When the functionality shows up below the search bar, please click on it so you can be sent to the “MultiPHP Manager” page.
When you land on the “MultiPHP Manager” page You will see three tabs on the top. The “PHP Versions” tab, the “PHP Handlers” tab, and the “System PHP-FPM Configuration” tab.
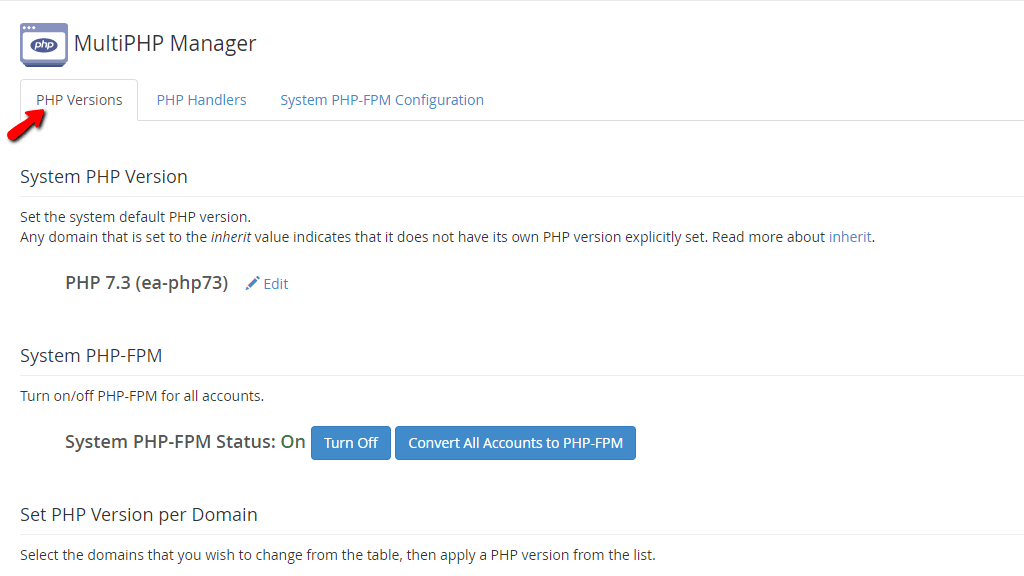
The “PHP Versions” tab will be opened by default, so let’s go over all the options it provides.
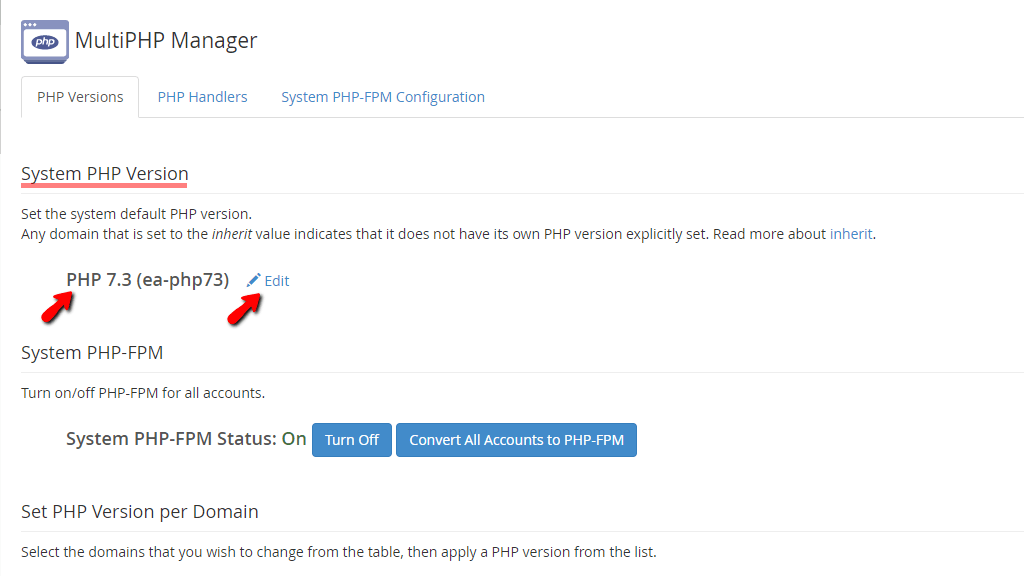
The first thing you are going to notice on the “PHP Versions” tab is the “System PHP Version” heading and underneath a brief explanation about the system default PHP version. Below this explanation, you will find the currently used system PHP version and on its right side an “Edit” link that will let you change the system PHP version to a different one. In order to change it, please press the “Edit” link.
Upon pressing the “Edit” link a dropdown menu will show up in its place, allowing you to select a new system PHP version from the ones you have already installed on the server using. We have a wonderful tutorial on the matter which you should definitely check out.
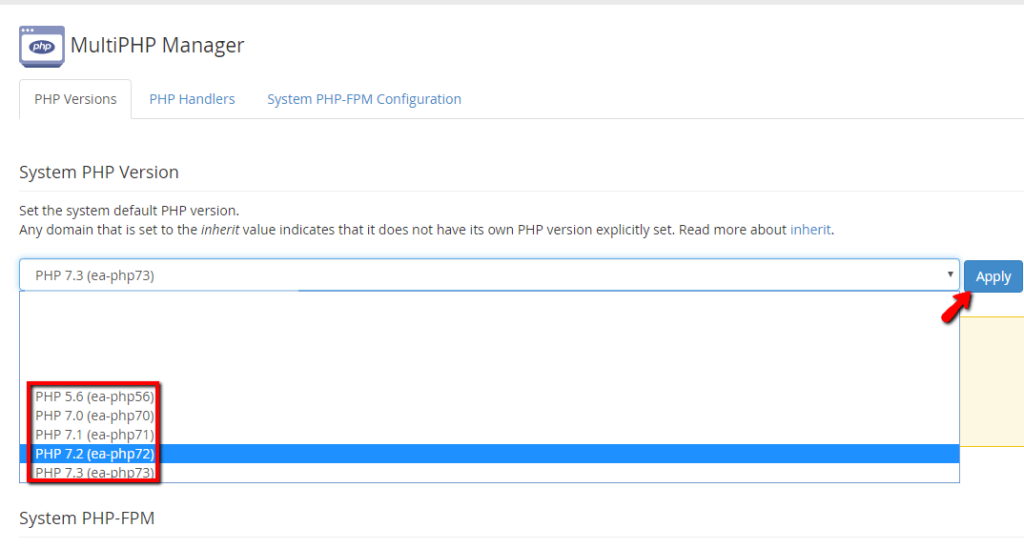
When you have selected the desired PHP version, please press the “Apply” button on the far right side of the dropdown menu.
Beneath this section, you will find the “System PHP-FPM” heading and under it the current status of the service. There will be two buttons next to the “System PHP-FPM Status” text. The first one is the “Turn On/Off” button. When pressed, this will turn on or will turn off the PHP-FPM service. On the right side of the “Turn On/Off” button, you will see the “Convert All Accounts to PHP-FPM” button. When it is pressed, all accounts that are currently utilizing this specific PHP version will have the PHP-FPM service enabled.
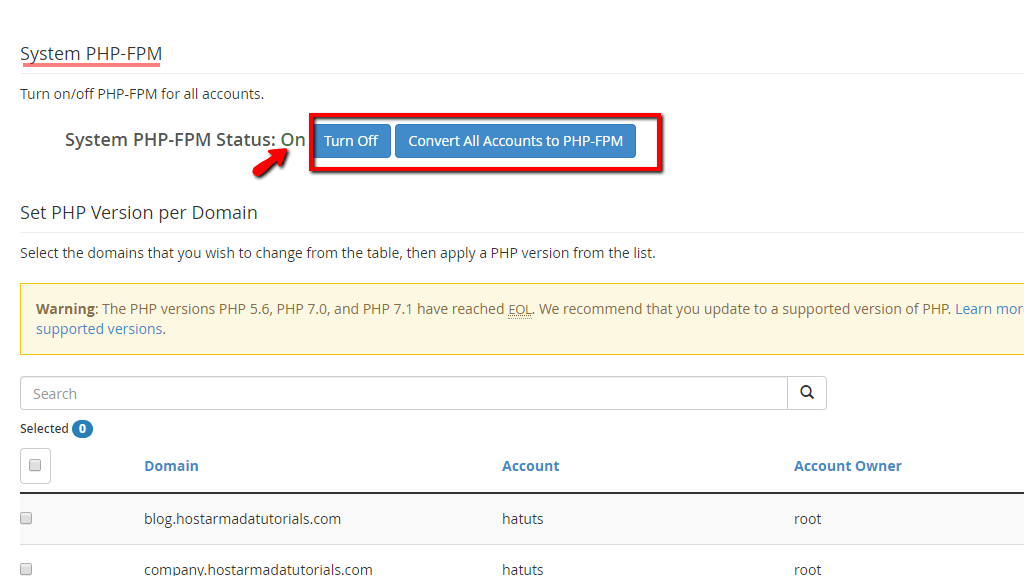
Scrolling down the screen you will see the “Set PHP Version Per Domain” heading. Below that you will find a search field and a table section containing the domains on the server. Please use the search field to find a specific domain you want to change the PHP version for. The table section contains additional information about the domains so let’s go over it.

To enable the PHP-FPM service on all domains, please use the checkbox located on the far left side of the table section. Analogically, you can do that with the PHP version. You will notice that there is a checkbox on the far left side of the table section for each domain as well. If you want to apply the PHP-FPM service or change the PHP version, select the domain by putting a tick in the checkbox.
When the desired domain names are selected, you may use the dropdown “PHP Version” and “PHP-FPM” menus located on the top right side, above the table section.

In order to apply a specific PHP version, select it from the “PHP Version” dropdown and press the “Apply” button located on the right side of the menu. In order to configure whether the PHP-FPM service is On or Off, please use the dropdown “PHP-FPM” menu, select your desired option and press the “Apply” button located on the right side of the menu.
In order to access the “PHP Handlers” tab, please press the link located on the right side of the “PHP Versions” tab. The “PHP Handlers” tab will allow you to select a PHP handler for each PHP version.
By default, apache does not natively support PHP scripts. In order to enable their use, a special module needs to be installed. This module tells Apache how to handle PHP scripts and is referred to as a PHP handler. Without a properly configured module, Apache will just send you the PHP file as a download since it does not have instructions to do other.
When you open the “PHP Handlers” tab you will notice a table section with all of the currently installed PHP versions on the server. The columns of the table will consist of:

Let’s go over some of the handlers the WHM control panel support.
Note that each PHP version can support ONLY 1 PHP hander. In order to select a PHP handler for a specific PHP version, please press the “Edit” button on the corresponding row.

This will transform the record under the “PHP Handler” column into a dropdown menu, which you can use to select the desired PHP handler. Note that not all of the above will be present here, as they need to be installed first.
If you would like to use a specific PHP handler and it is not present inside this list, please contact our Technical Support Team over the ticketing system in your client area. They will be happy to help you out.
When you have selected the desired handler, please press the “Apply” button underneath the “Actions” column.
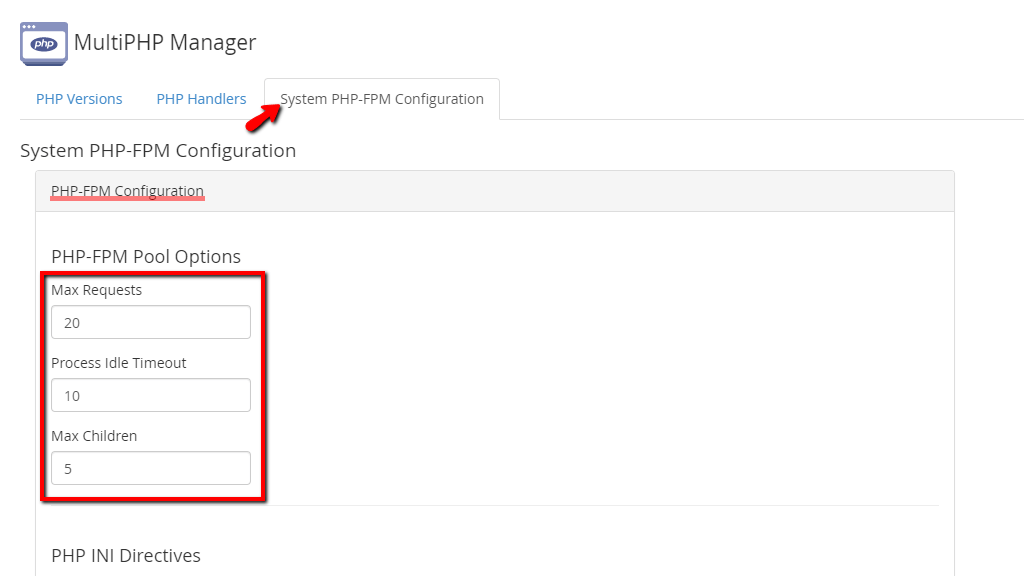
In order to access this tab, please press the “System PHP-FPM Configuration” tab, located on the right side of the “PHP Handlers” tab.
The “System PHP-FPM Configuration” tab will allow you to configure the system’s PHP-FPM pool options and php.ini directives. When you land there, the first thing you will see is the “PHP-FPM Configuration” section.
This is the place where you set the following options:
The second section on this page will be the “PHP INI Directives” section. It will allow you to modify the behavior of the php.ini file based on your preference.
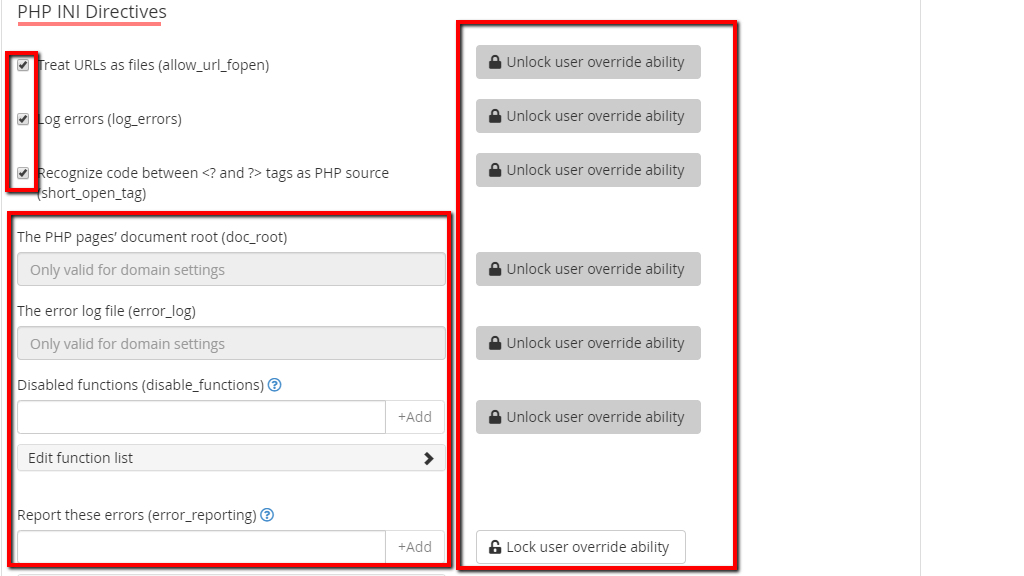
Let’s go over all of the available options in this section.
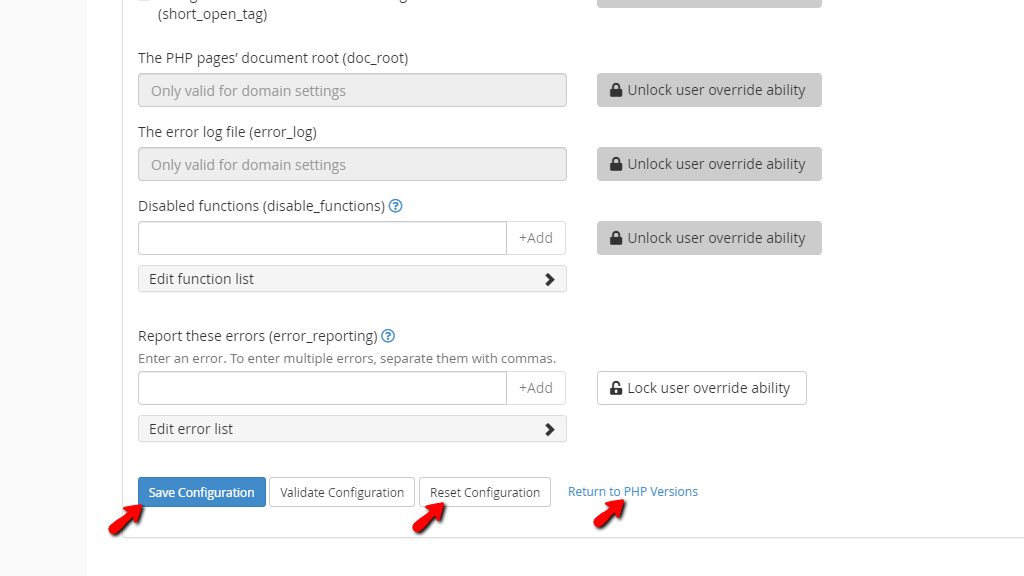
When you are done applying the desired settings in this tab, please, press the “Save Configuration” button located on the bottom of the page. If you want to start over with the settings and you are not happy with the current ones, please press the “Reset Configuration” button located on the bottom of the page, on the left side of the “Return to PHP versions” link.
When the “Save Configuration” button is pressed a green bar will appear on the top right side of the screen, notifying you that the changes have been saved.

Here you go! All of the information concerning the “MultiPHP Manager” feature in the WHM control panel. It is really easy to navigate through and apply the needed settings for your domains. If you are having issues using it, please feel free to contact our Technical Team. They are 24/7 available through the ticking system in your Client Area.

Sebahat is a young and bright woman who has become an invaluable part of our team. She started as a Customer Care Representative, mastering that role and, along the way, growing into a tech-savvy individual who is well acquainted with every support layer of the company. Driven by her aim to improve our customers’ experience constantly, she is committed to enhancing the extraordinary support we deliver.
Learn more about WHM in the other tutorials that we have: