
Learn Ghost
Being as unique and original as possible is always a plus. This is something that will differentiate you from the rest of the bloggers out there. The publication identity of your blog can give you an edge over your competitors and leave a positive impression on your visitors, thus welcome them to come and read your content. In this article, we are going to talk about the process of changing the favicon, the website logo, and the cover image of your Ghost website. Here we go!
For a start, you have to log into your Ghost Admin Dashboard. To do so, please open your favorite browser and enter your domain name, followed by "/ghost". For example:

Once logged, please navigate through the left-hand sidebar to Settings > General.

This will take you to the “General Settings” page, allowing you to perform all sorts of changes on your blog.
A publication icon, also known as a favicon, is the little image that is displayed on the left side of the browser tab while you are reviewing a particular website. It is usually a very small image (60x60 dimensions), and it is required to be either in an .ICO or a .PNG format.
To change your favicon, please look for the “Publication Identity” section. Under it, you will see the “Publication Icon” label. On the far right side of the row, you can locate the “Upload Image” button. Clicking on it will open a window, allowing you to upload an image from your local computer or device.
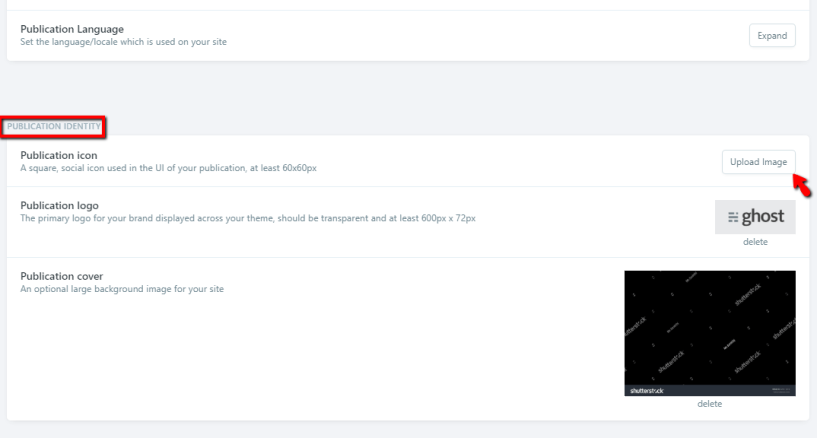
When an image is selected, it will replace the “Upload image” button. Underneath the image, you will see a “delete” link, which will remove the image should you need to replace it in the future.

When you have selected your favicon, and you are ready to display it on your site, please press the “Save settings” button located on the top right corner of the screen.
The publication logo is an image displayed in several places across your site. It is usually inside the theme and will appear across your pages and posts. Typically, this icon is something related to the content on your blog or your brand.
To change your logo, please look under the “Publication Identity” section. Beneath, you will see the “Publication logo” label. On the far right side of the row, you will typically see an image and a “delete” link below it. If there is currently no logo for your site, you will see an “Upload Image” button.
![]()
To upload a new logo, please press the “delete” link. This will reveal the “Upload Image” button, and when pressed, a popup window will appear, allowing you to upload an image from your local computer or device.
![]()
This image will then take the place of the “Upload Image” button. The image has to be at least 600px72px dimensions.
![]()
To display it on your site, please press the “Save settings” button located in the top right corner.
The publication cover will represent the background image of your site and will be shown on all pages and posts. Typically, on a default ghost installation, you will see a completely black image. You should aim for it to be in contrast with your logo so that it is easily noticeable by your visitors.
To change your publication cover, please look under the “Publication Identity” section. Beneath, you will see the “Publication Cover” label. On the far right side of the row, you will likely encounter an image and a “delete” link below it. If there is currently no cover for your site, you will see an “Upload Image” button.

Clicking on the “Upload Image” button will open a popup window, allowing you to upload the desired cover image. You may upload a cover with any type of dimension. However, an image with a smaller scale will be stretched out and will not look very pleasing, so you should aim to use a bigger image with high pixel density.
When you upload an image, it will take the position of the “Upload Image” button, and underneath, you will see the “delete” link, allowing you to remove it in the future.

Lastly, to save the changes you made to the cover of your blog, please press the “Save settings” button located on the top corner of the page.

There you have it! This concludes our tutorial on how to change the publication identity of your website, giving it a unique, recognizable look! We hope that the provided information was useful, and if you liked it, please be sure to check the rest of our Ghost Tutorials!

Sebahat is a young and bright woman who has become an invaluable part of our team. She started as a Customer Care Representative, mastering that role and, along the way, growing into a tech-savvy individual who is well acquainted with every support layer of the company. Driven by her aim to improve our customers’ experience constantly, she is committed to enhancing the extraordinary support we deliver.
Learn more about Ghost in the other tutorials that we have: