
The core features in Joomla provide all the functionalities you will need to develop a simple website. But what happens if you would like to include specific, more complex functionalities or features to your site? The need for installing Joomla extensions arises.
Before we move forward, you need to know there are several different types of extensions in Joomla, and we will do our best to explain what is the purpose of each of them.
Thanks to the vast Joomla community, there are thousands of free and paid extensions to choose from and integrate the functionality you are after.
There are a couple of methods of installing Joomla extensions, and we will introduce them in the following lines.
Now that we got it all clear let’s step into the actual installation of Joomla extensions.
This is the easiest and fastest method for installing extensions in Joomla. The “Install from Web” feature was introduced in Joomla 3.2. It allows you to install extensions from the Joomla! Extensions Directory (The official Joomla Repository) directly through your own Joomla Admin Dashboard.
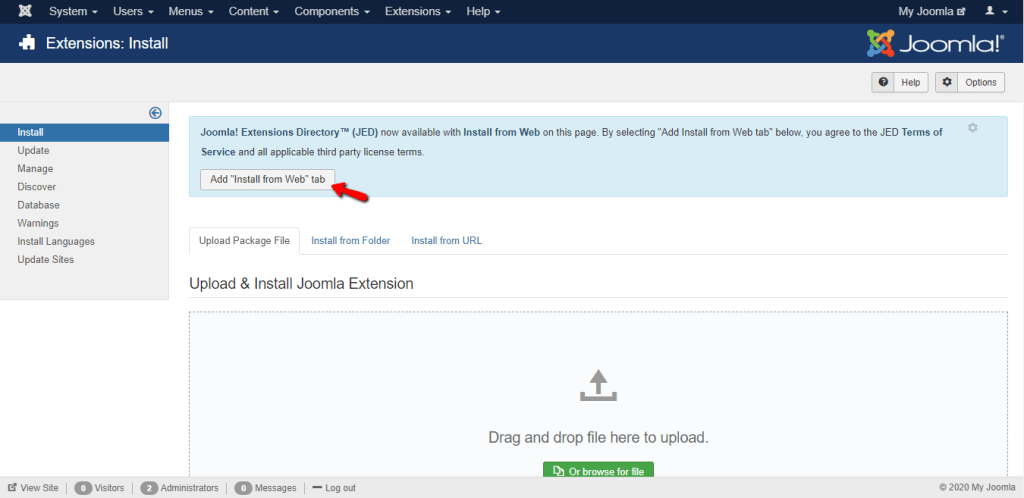
In order to begin, please log in to your Joomla Admin Dashboard and navigate through the top menu bar to Extensions > Manage > Install.

On the Installation page, you will notice a message informing you of the possibility of enabling the “Install from Web” feature to your Joomla installation. Before you proceed, please note that by clicking on the “Add Install from Web tab” button, you will automatically agree to the Joomla! Extensions Directory (JED) terms.
Once the button is clicked, you will see the “Install from Web” tab appearing next to the other tabs.

As we previously pointed out, this tab connects your Joomla website with the official Joomla Repository and allows you to install the desired extension(s) directly from your backend.
You will notice the “Categories” menu on the left-hand side, which lists different extension categories. You can also use the search bar at the top in case you are looking for a specific extension.
Another great thing is that for each extension, it is indicated whether it is a component, module, plugin, and paid, or free. You can also directly check the votes and reviews for the extensions.
Now, the installation part is extremely simple. It is literally a one-click task. For the purpose of our tutorial, we will be installing the “ARK Editor”. You should follow the exact same steps for your desired extension.
Once you locate the extension, please click on it to access the extension overview page.

Once on the Extension page, you will need to simply click on the “Install” button.

Afterward, you will be prompted with a new message requiring you to confirm the installation, and all left to be done is to click on the “Install” button.

The installation process might take a few moments, and once it is completed, a new message will appear informing you that it was successfully completed.

And with that done, you have learned how to install new extensions on your Joomla website.
Apart from installing extensions through the “Install from Web” feature, you can also install Joomla extensions manually. The manual installation process is not so complicated either. However, you may find it a bit harder compared to the previous method.
You will need to again navigate through the top menu bar to Extensions > Manage > Install.
As you have probably noticed previously, there are three additional tabs that are all used for installing extensions manually in a different manner.
Regardless of which method you decide to use, you will first need to access the Joomla! Extensions Directory and find your desired extension. If you ever forget the address, you can access it through your Joomla Admin Dashboard by navigating through the top menu bar to Help > Joomla! Extensions.
The interface of the page is quite similar to the one available in your backend under the “Install from Web” tab. Therefore, we believe that you will feel comfortable navigating through and find the extension you are looking for.
Once you locate it, please click on it to access the overview page and scroll down to the “Download” button.

When the “Download” button is clicked, you will be redirected to the official extension page. Please note that this will vary depending on the extension you are aiming to install.
On the extension page, you will need to locate the download section. When you find the download button, you can directly click on it, and the archive file will be downloaded on your local computer, and you can proceed with the first two installation methods we have described above. Alternatively, if you wish to provide a direct link, you can right-click on the download button and select the “Copy link address” option. Please note that you might not be able to locate the direct link for all Joomla extensions.
For the purpose of this guide, we will give you an example by installing the same “ARK Editor” this time by providing a direct URL address.
Under the “Install from URL” tab, we will simply paste the source URL into the “Install from URL” field and click on the “Check and Install” button.

After a few moments, the installation will be completed, and a message stating it was successful will be displayed along with information for the extension itself.

And there we are - we have managed to successfully install the extension even manually.
As you can see, installing Joomla Extensions is a relatively simple task; therefore, we believe you will be able to handle it on your own. However, if at a certain point you happen to experience any sort of difficulties, please make sure to submit a ticket to our Technical Support Staff, and they will gladly assist further with the installation of any extension.

Sebahat is a young and bright woman who has become an invaluable part of our team. She started as a Customer Care Representative, mastering that role and, along the way, growing into a tech-savvy individual who is well acquainted with every support layer of the company. Driven by her aim to improve our customers’ experience constantly, she is committed to enhancing the extraordinary support we deliver.
Learn more about Joomla in the other tutorials that we have: