
In X-Cart, like in any other eCommerce software, the templates used for the automatically generated email notifications are configured by default for your convenience. On some occasions, you might need to edit the general settings or customize the template itself and give it a personal touch.
In this tutorial, you are going to learn how to control your Email Notifications and modify their Subject, Header, Greeting, and Signature.
To begin, please log in to your X-Cart Admin Area and navigate through the left-hand side menu bar to Store setup > Email notifications.

You can see there are several tabs on this page. In this guide, our primary focus is going to be on the first two "Settings" and "Header, greeting & signature" tabs, as they hold the settings related to the email notifications.
Under the first "Settings" tab, you can see a table containing a full list of all automatically generated Email Notifications in X-Cart. It consists of three columns:
Generally, all email notifications have the same configuration structure. Therefore, we are going to give you an example with the "Failed login attempt" notification.
Afterward, you are going to have the fundamental idea of how to edit and configure the rest of them.
To edit a particular email notification, you have to click on its title.

Each Notification page is divided into three sections holding specific settings.
Under the first section, you can edit the "State", which controls whether this notification is enabled or disabled, and you can modify the "Subject" of the email message. You are allowed to use variables for the email subject, if necessary. A full list of all variables supported for this notification could be found by hovering over the question mark icon.
Variables allow you to provide a placeholder for a changeable value. The placeholder could be the recipient of the email message, order ID, reset link, etc.

Second is the "Scheme" section. Under it, you can enable/disable the Email Notification's "Header", "Greeting", and "Signature" by using the corresponding toggle switch button. We are going to review how to customize them in the following section of this tutorial.
The "Text" content-box is where you have to enter the actual Email Notification body content. It is represented by a WYSIWG editor with some pretty handy tools, which allow you to easily format the text, insert images, links, etc. You are also allowed to use variables for the body text. You can check the available variables by again hovering over the question mark icon next to it.

The "Dynamic Message" option is intended in case you want to insert a specific TWIG code into the Email Notification. In such a case, you need to click on the "Edit" button. Once this is done, a new tab is going to open, and under it, you have to click on the "Add TWIG code" button to insert the necessary code.

Last is the "System settings" section, which can be expanded by clicking on the arrow icon. Under it, you are going to be able to edit the Email Notification title and descriptions, which are intended for your and other admin users' reference.
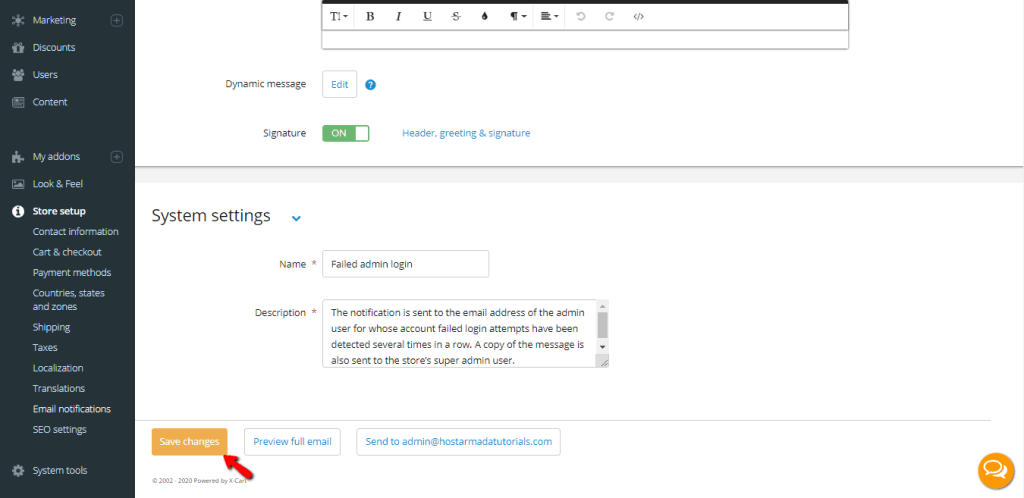
When you perform the intended changes, please do not forget to click on the "Save changes" button to apply them. You can also preview the Email Notification and send it to your admin email address to check the result.
Now that you know how to edit your Email Notifications let's see how to customize their Header, Greeting, and Signature.
This can be done from the second "Header, greeting & signature" tab.
You can see there are two sections under this tab:
The format of each group and the manner in which they are edited is the same, therefore we are going to give you an example with the first customers' group.

When editing the Header, Greeting, and Signature, you are also allowed to use variables. For instance, you can see that the default values are constructed using variables. Similar to the previous examples, you can see the relevant variables by clicking on the corresponding question mark icon.
When you apply the desired changes, please hit the "Save changes" button.
Here we would like to take a moment to congratulate you on learning how to handle your X-Cart Email Notifications and thank you for trusting our guidance. We hope you found the tutorial useful and easy to follow. As always, in case something was not entirely clear, or you happen to experience any difficulties, you are welcome to contact our Support Team.

Sebahat is a young and bright woman who has become an invaluable part of our team. She started as a Customer Care Representative, mastering that role and, along the way, growing into a tech-savvy individual who is well acquainted with every support layer of the company. Driven by her aim to improve our customers’ experience constantly, she is committed to enhancing the extraordinary support we deliver.
Learn more about X-Cart in the other tutorials that we have: