
The “EasyApache 4” feature in the WHM control panel allows you to update and configure your current Apache/PHP components on the server. In addition to that, you are able to install new Apache and PHP modules/extensions along with additional software on the server such as the Ruby programming language, NodeJS, Apache Tomcat, etc.
Using the “EasyApache 4” feature, you will be able to create custom profiles that contain specific software along with the Apache/PHP configuration that you can then deploy on another server. This comes in handy if you have more than one server as the “EasyApache 4” functionality has a huge number of settings and going through all of them each time, selecting the ones you need can be very time-consuming.
In this tutorial, we will not be covering each individual component of PHP or Apache as there is simply too much to go through. The VPS/Dedicated Servers you purchased from HostArmada have “EasyApache 4” profiles that were carefully put together by our system administrators to provide our clients with the most optional settings for PHP and Apache so you will most likely never need to do anything in these regards unless your application has a very specific requirement. Let’s get started.
First, you need to log into the WHM service for your VPS or Dedicated Server. If you are not sure how to do that, please check our How to access the WHM service tutorial. After you have logged in, please use the search bar on the left side of the page and type “EasyApache 4”.

When the functionality shows up below the search bar, please click on it so you can be sent to the “EasyApache 4” page.
When you are redirected to the “EasyApache 4” page the first thing you are going to see on the top is a blue button that will have a different status. Typically, the button should say “EasyApache 4 is up to date” and it will be grayed out. This means that every component affected by this functionality is up to date. On its right side, you will find a “Help Links” dropdown, which contains useful links. When pressed they will redirect you to the cPanel documentation filled with information about “EasyApache 4”.
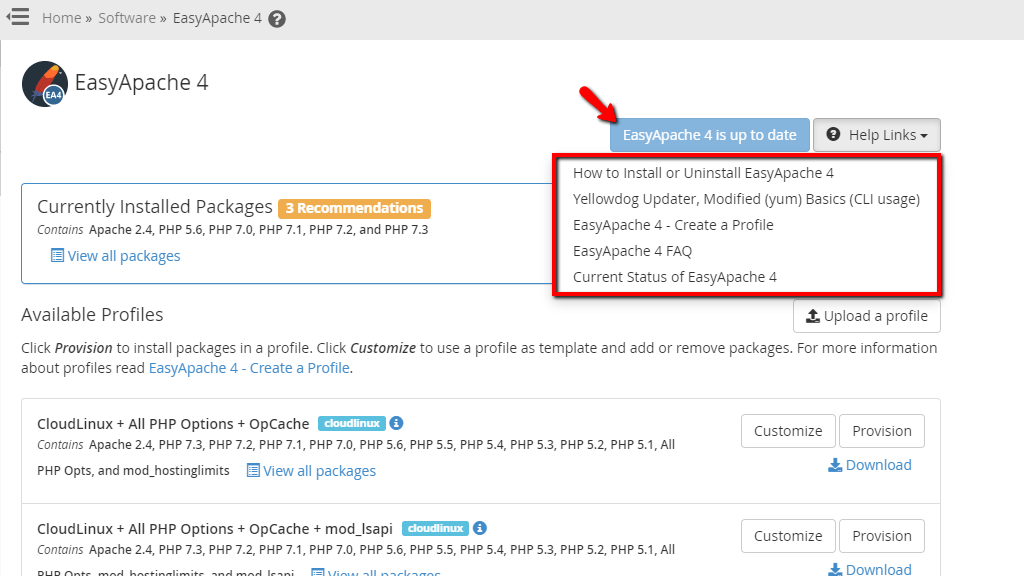
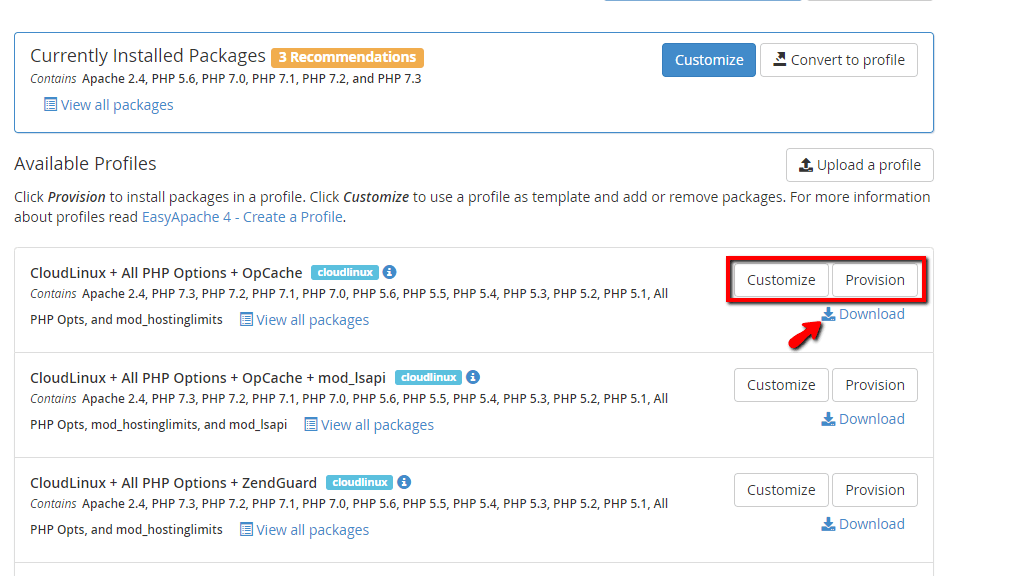
Underneath, you will find the “Currently Installed Packages” section. On the top right side of the section, you will find two buttons - the first is the “Customize” button that will let you edit the current profile when it is pressed. The second one is the “Convert to profile” located on the right side of the “Customize” button.

Pressing the “Convert to profile” button will open a window beneath this section that will allow you to convert the current configuration into a profile. This window contains 4 text fields. Let’s go over them.

When you have typed the requested information inside the text fields, please press the “Convert” button located on the bottom left side of the window.
Below the “Currently Installed Packages” section you will find the “Available Profiles” label. On its right side, you will see an “Upload a profile” button. It will let you deploy an already created EasyApache 4 profile on the server.

When the “Upload a profile” button is pressed it will open a window beneath the button itself. This window will have two options - “Browse a local file” or the “Retrieve from URL” option. The “Browse a local file” option will allow you to upload an EasyApache 4 profile from your local computer, whereas the “Retrieve from URL” will let you enter a URL, which leads to a JSON file containing the profile.
When you have selected the file located locally on your computer or the URL that has a JSON file at the end, please press the “Upload” button located on the left side of the window. This will upload the file and it will be shown under the “Available Profiles” section at the very bottom of the page.

In the “Available Profiles” section you will see premade EasyApache 4 profiles that will be stored on the server by default. You can review them and choose the best profile that will suit the needs of your server. You will see the name of the profile, along with a list of what it contains. There will be an (i) button inside as well that will allow you to expand the row and show more details about the profile itself.

On the top right corner of each profile, you will find two buttons and a link.
We have gone over the index page of the “EasyApache 4” feature and you should now have a good understanding of where everything is situated. In the next paragraphs of this tutorial, we are going to be looking at the customization options for the profiles. Let’s get started.
In order to alter the profile that is currently loaded, please press the “Customize” button located inside the “Currently Installed Packages” section located on the top of the screen.

Alternatively, you can customize one of the available profiles in the “Available Profiles” section below, by pressing the “Customize” button located inside the row corresponding to the EasyApache profile you want to edit.
When the “Customize” button is pressed, you will be forwarded to the customization page. This entire process is represented by a couple of menus and after performing changes on one menu you will be able to proceed onto the next.

You can also start the customization process from a different menu or navigate between them, selecting the options you need by pressing the respective link.
The options inside the “Apache MPM menu” will allow you to select how the web service will handle incoming requests and how it will process them.
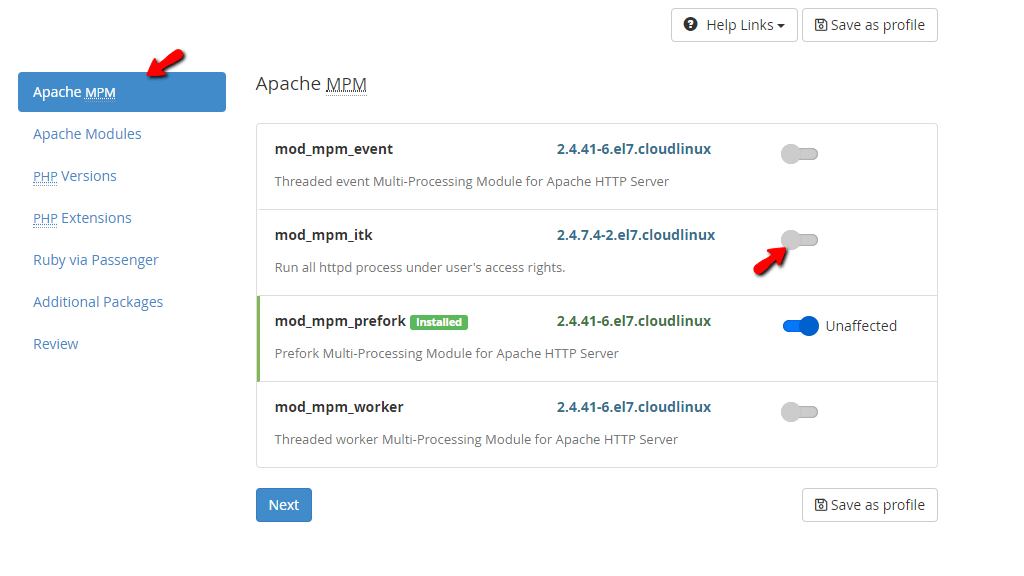
To select a multi-processing module, please use the toggle switch located on the row corresponding to the desired module. Note that only one MPM option may be present at a time and toggling one will disable the currently enabled MPM.

When you are done, please press the “Next” button located underneath the MPM options.
The options inside the “Apache Modules menu” will enable you to select the Apache modules you need. You will also have a search field above the modules list that will help you easily locate the desired modules by typing in their name.

To select a module from this list, please press the toggle switch that will be on the row corresponding to the module you want to install. There will be cases when enabling one module may request that you disable another one. This will happen because they are either incompatible or they are similar in nature and will interfere with each other.
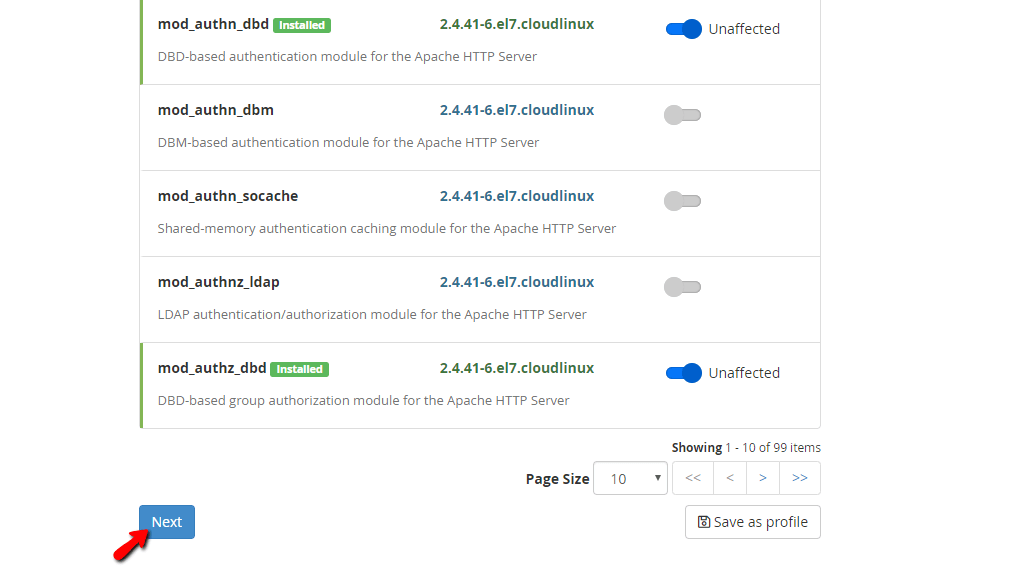
When you are done, please press the “Next” button located at the bottom of the page.
The options inside this menu will enable you to use the toggle switch to select which PHP versions can be used on your server. If you choose a version that is not currently installed, the WHM control panel will detect the installed extensions on the PHP versions and ask if you want to install them for the new version.
In order to do that, please press the “PHP X.X and Extensions” button located inside the window that will be prompted when the toggle switch is pressed.

In addition to the option of installing all the extensions for the new version, you will have a choice to install the PHP version without any extensions when you press the “PHP X.X Only” button or you may select the “Edit” link and make your own extension list for the new PHP version you selected.

When you are done, please press the “Next” button located at the bottom of the page.
The many options in this tab will allow you to select the PHP extensions for the PHP versions on the server. It will contain a list of the PHP extensions for all installed PHP versions. You can also use the checkboxes below the “PHP Extensions” heading to filter out the extensions based on their versions. You can use another level of filtration by typing the name of the extension in the search field under the PHP versions checkboxes.
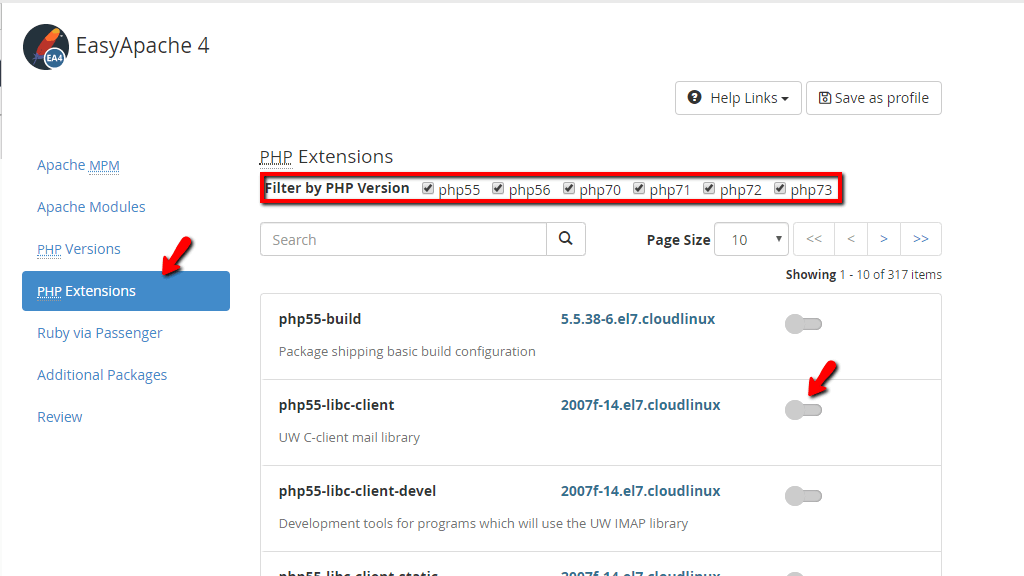
To select a PHP extension from the list, please use the toggle switch on the row corresponding to the desired extension.
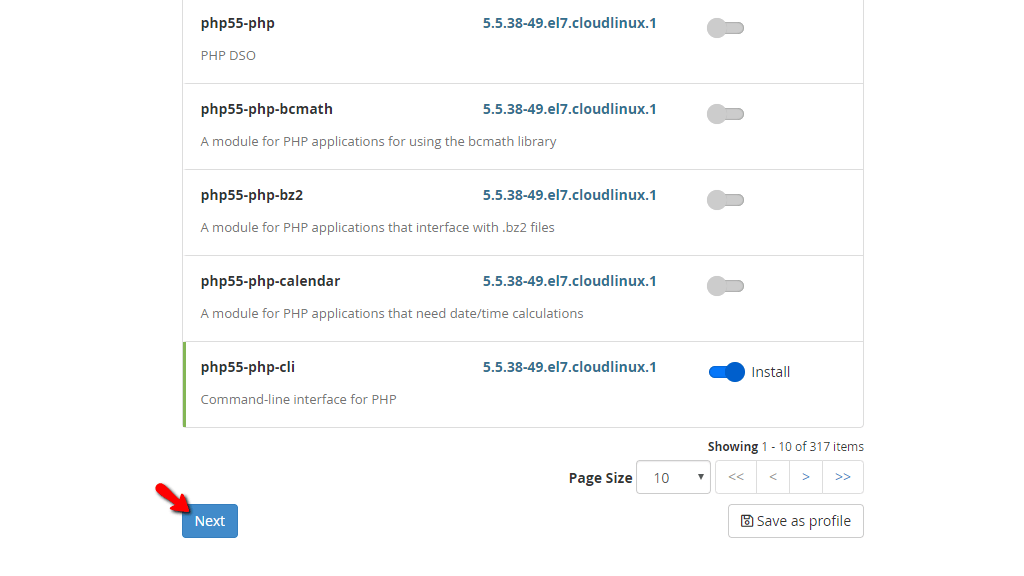
When you are done enabling the extensions, please press the “Next” button located on the bottom of the page.
The options inside the “Ruby via Passenger” menu will allow you to install various packages for the Ruby programming language enabling you to use it on the server.

Please select the options you need using the toggle switch corresponding to the row of the package you require.

Once the desired packages are selected, please press the “Next” button located at the bottom of the page.
At this time, the WHM control panel allows you to install two additional packages on the server. These are the NodeJS and the Apache Tomcat.
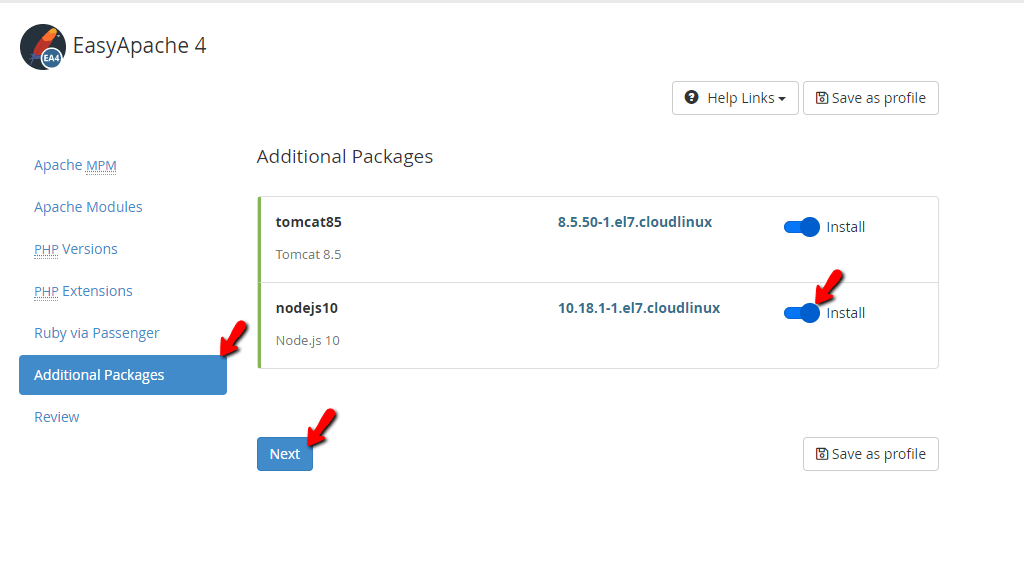
You may install them by simply clicking on the toggle switches located on the row of the desired package. When you are done, please press the “Next” button located at the bottom of the screen.
The “Review” menu is the final screen where you will end up after selecting all of the desired Apache/PHP/AdditionalPackages options. On the top of the page, you wee see a summary of the options you selected during the customization process.
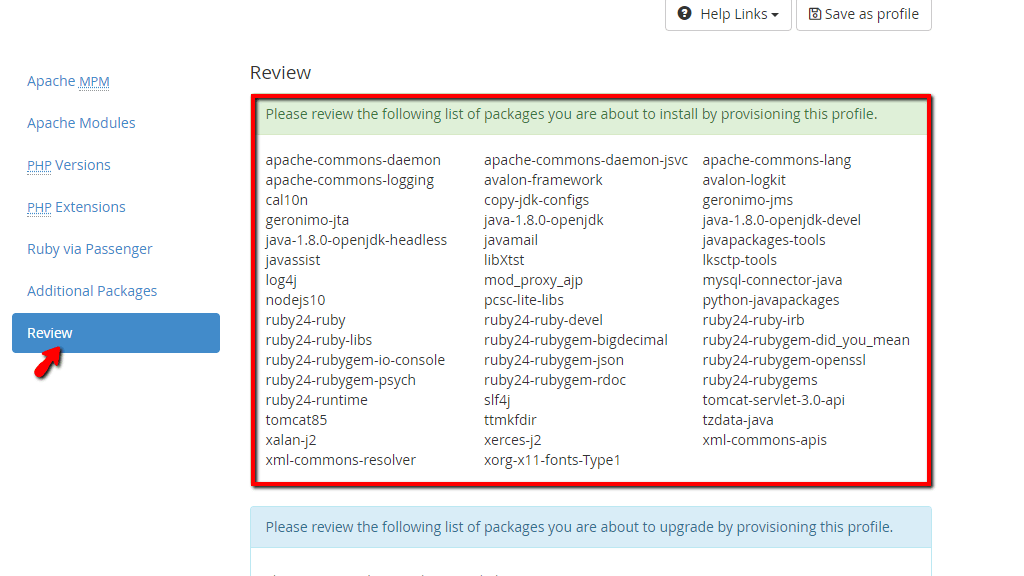
Scrolling down, you will see a list of the packages that will not be affected by provisioning this profile.

If you are happy with the changes you have made, please press the “Provision” button at the bottom of the page. If you want to save the profile, press the “Save as profile” button located on the right side of the “Provision” button. This will display text fields previously discussed for the “Convert to profile” paragraph. If you are unhappy with the changes, please press the “Cancel” link located on the right side of the “Save as profile” button. When the “Cancel” link is pressed, you will be taken back to the index page of the “EasyApache 4” feature.

When the “Provision” button is pressed, you will be redirected to a changelog screen that will display that the provisioning process has been started.
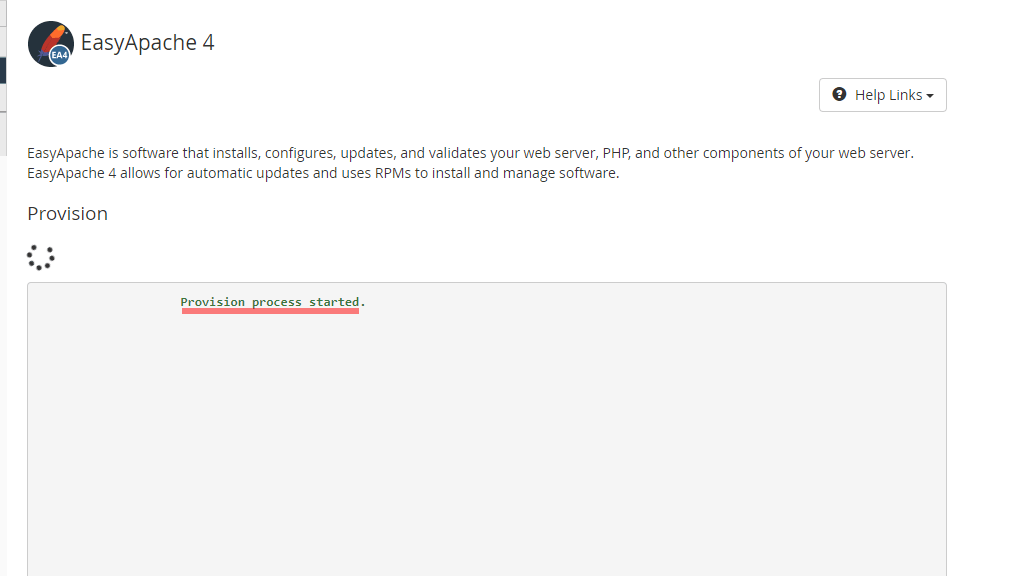
This process can take a few minutes to complete, as the WHM control panel is currently fetching all of the requested components from various RPMs.

After this process is finished, you will see the “The provisioning process is complete.” text located inside a green bar. Underneath it, you will find the complete changelog of what happened in case you want to follow through with the steps.

To go back to the index page of the “EasyApache 4” functionality, please press the “Done” button located on the bottom of the screen.
This concludes our tutorial in regards to the “EasyApache 4” feature in the WHM control panel. The functionality gives room for a lot of flexibility in terms of the Apache and PHP settings on the server. Its intuitive nature allows you to easily navigate through its interface and configure the server to your liking. If you need any assistance or you are facing issues with the “EasyApache 4” feature, please do not hesitate to contact our Technical Team over the ticking system in your Client Area.

Sebahat is a young and bright woman who has become an invaluable part of our team. She started as a Customer Care Representative, mastering that role and, along the way, growing into a tech-savvy individual who is well acquainted with every support layer of the company. Driven by her aim to improve our customers’ experience constantly, she is committed to enhancing the extraordinary support we deliver.
Learn more about WHM in the other tutorials that we have: