
The “Transfer Tool” feature in the WHM control panel allows you to transfer multiple accounts from a different server. It is really flexible in terms of the control panels it can perform the migrations from, more specifically Plesk, DirectAdmin, Ensim, and of course cPanel/WHM. The requirements in order for this functionality to work are the root password for the remote server and an operational openSSH service on both the remote and the source servers. Our VPS and Dedicated Servers have fully operational openSSH services so you have nothing to worry about in these regards. If you are not sure about the remote server, please contact the service provider managing it so they can let you know.
The main focus of this tutorial will be the transfers from a cPanel/WHM server, as this is the product that we offer support for. Additionally, this method ensures that the migration is done 100% correctly and there is no missing content when it is finalized. Let’s get started.
First, you need to log into the WHM service for your VPS or Dedicated Server. If you are not sure how to do that, please check our How to access the WHM service tutorial. After you have logged in, please use the search bar on the left side of the page and type “Transfer Tool”.

When the functionality shows up below the search bar, please click on it so you can be redirected to the “Transfer Tool” page.
Before we begin, we would like to touch upon a few important things you need to be aware of when using this feature.
Now that you have been acquainted with a few specifics of this tool, we can continue forward.
Upon landing on the “Transfer Tool” page, the first thing you will come across is the “Remote Server Information” section. It will contain two fields.

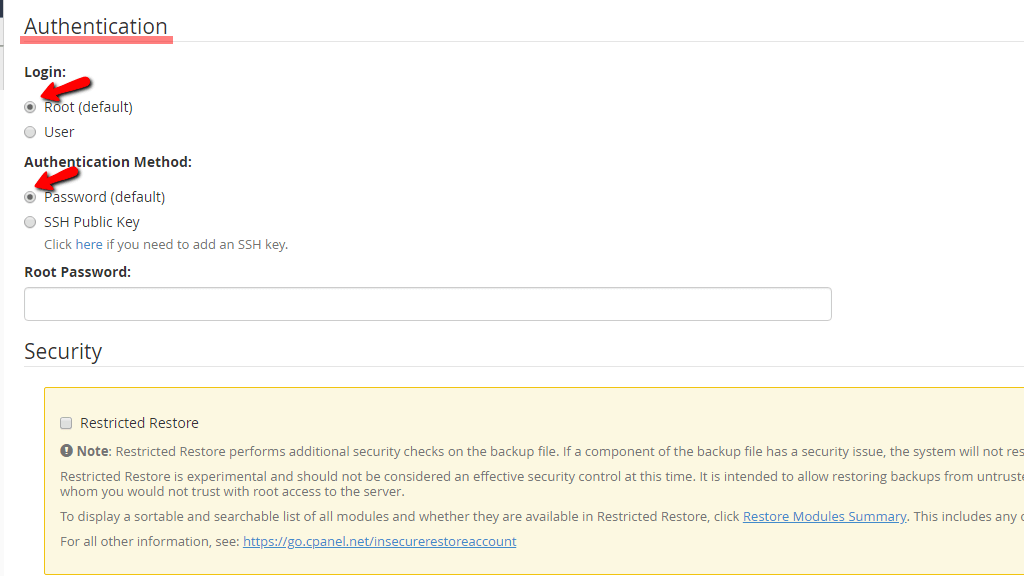
The next section will be the “Authentication” section. Here, what will be requested from you is the following.
Here is what this section looks like when the “User” and the “SSH Public Key” options are selected with the radio button below.
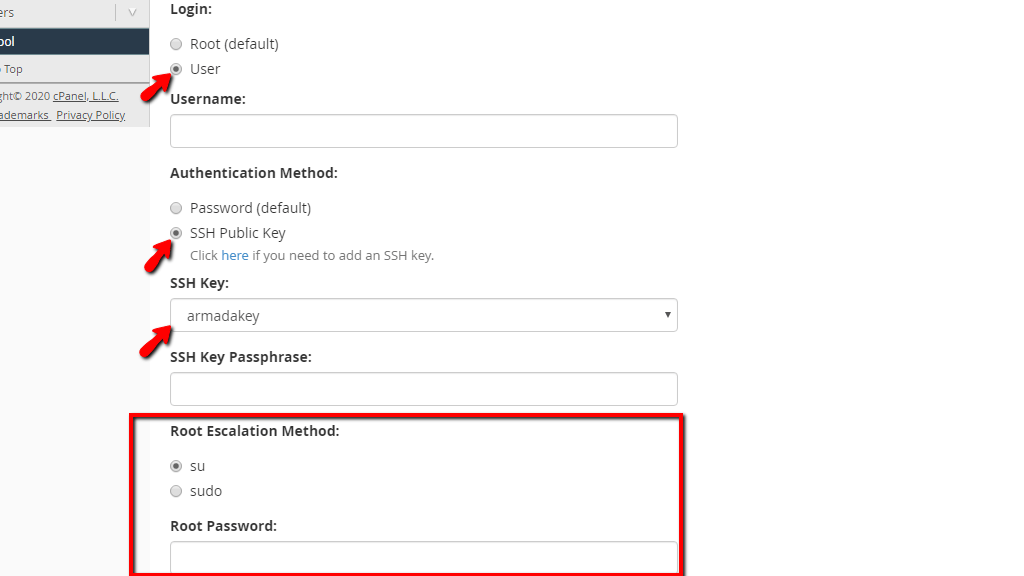
Another new thing you will find in this example is the “Root Escalation Method” if the “su” option is selected via the radio button, a “Root Password” text field will appear where you need to enter the root password for your server. If the “sudo” option is selected, the “Root Password” text field will disappear and only the “Username Password:” field will remain.
Note that the user from the remote server needs to have “sudo” privileges there, otherwise, the link between the two servers will not be established and the transfer process will not go through.

Scrolling the page downwards, you will reach the “Security” section. It contains a single checkbox option - “Restricted Restore”. At this point, you should avoid using it, as it is still experimental and should not be considered an effective security control method. Its intent is to allow the restoration of backups from untrusted sources. We STRONGLY discourage you from transferring and restoring any account backups from providers whom you do not trust.

The last section available on this page is the “Advanced” section. In order to expand it, please click on the “Show” button located on its right side.

This will open a whole lot of options, so, let’s explain what each one of them does.

When you have selected all of the options you need and set the login and authentication information, please press the “Scan Remote Server” button located on the bottom of the page.

Once this is done, please allow a few moments for the process to be successfully completed.
After a brief loading screen, you will be sent to the “Account List” page. On top of the page, you will see a blue bar, and inside, you will find information about the “Source” server and the “Target” server, such as their hostname and the WHM version they are using. Below, you will find the “Rescan Source Server” button which will allow you to do an additional scan of the accounts on the remote server. This can be useful if an update to the accounts on the “Source” server was made after the initial scan or a new account was added.

Underneath the blue bar, you will find three tabs. The “Accounts” tab, the “Packages” tab, and the “Service Configurations” tab. Let’s go over them.

The first tab we are going to be going over is the “Accounts” tab. It will be the first thing that will be selected by default.
The Accounts Tab
Right Under the tabs, you will find a search field, allowing you to filter the accounts on the “Source” server and locate only the ones you need. Beneath this search field, you will see a table section containing all of the accounts on the “Source” server.

Now, let’s explain all of the columns inside this table section.
At the very top of the table, you will see that the first row is greyed out. You may use the checkboxes inside it, in order to enable the option for every account.

The checkbox at the far left side of the grayed-out row will select all of the accounts for migration.
The Packages Tab
In order to access this, please click on the “Packages” tab which will be located on the right side of the “Accounts” tab.

When you are redirected there, you will see a search field below the tabs. You may use it to search for a specific package. Below this, you will find the packages section where you will see all of the “Package Names”. The first row will be grayed out once again and on the far left side, there will be a checkbox, which will allow you to select all of the packages from this list.
The Service Configurations Tab
This is the last tab we are going to discuss. In order to access it, please click on the “Service Configuration” tab which is located on the right side of the “Packages” tab.
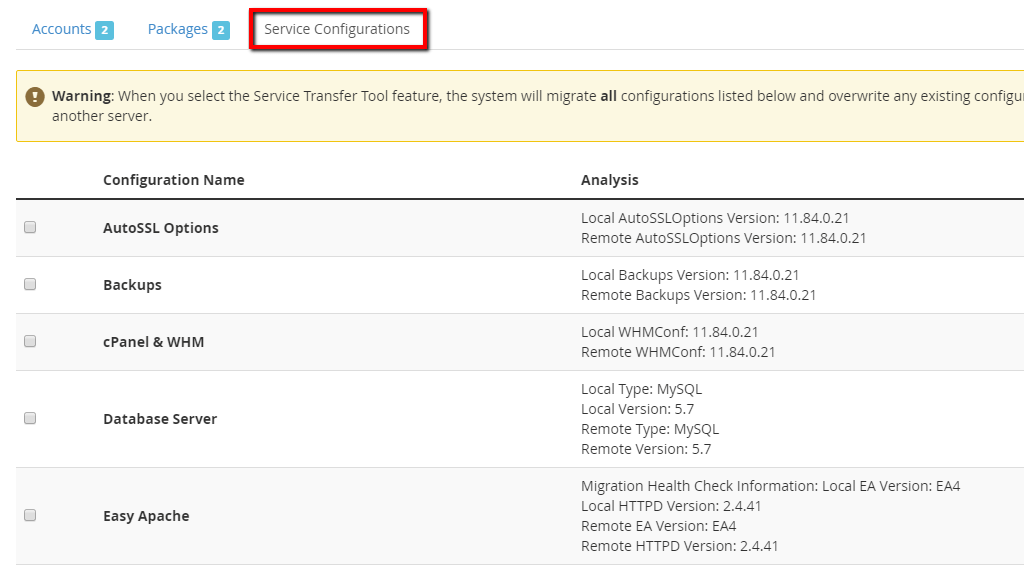
It will display configurations that you can migrate over to the “Target” server. Here is the list of all the options.
Additionally, you will also find an “Analysis” column that will show the versions of all the above for the “Target” and “Source” server or in this case the “Remote” and “Local”.

When you are done with choosing your accounts, selecting your packages and service configurations you want to transfer, please press the “Copy” button located on the bottom of the screen, regardless of the tab you are currently viewing.

Above the “Copy” button, you will find a short summary of what you are going to move. In our case, we have selected two accounts and two packages.
When the button is pressed the “Account Transfer” functionality will appear, displaying the status and progress of your account restoration along with any warnings if such are present. Account transfers appear on the left side of the page, while site restorations appear on the right side of the page.
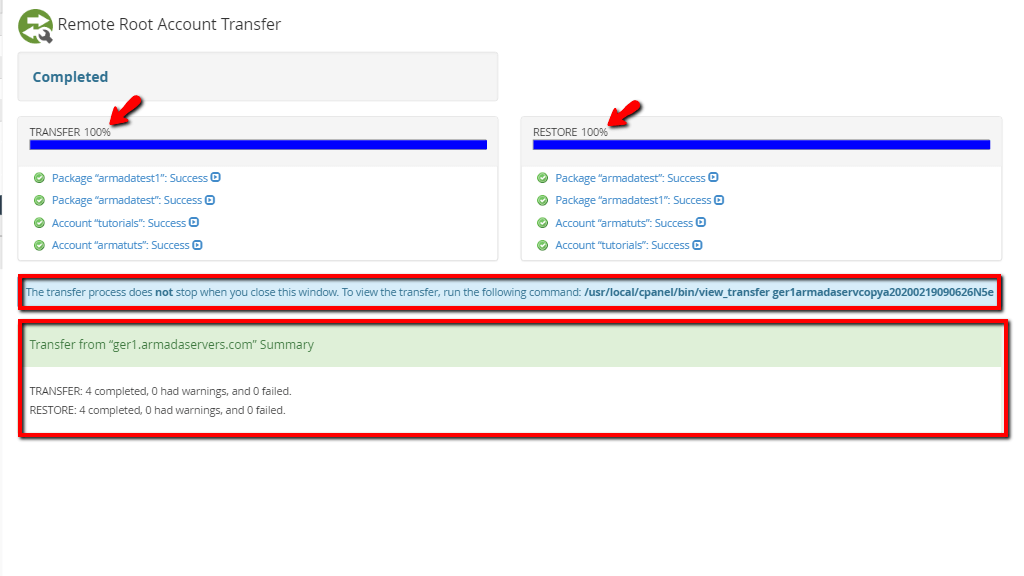
Under the transfer and restore sections, you will see a blue bar containing a message informing you that this process continues even after this page is closed and you may view this in real-time through the terminal by executing the provided command. Below it, there will be a summary section letting you know what happened after the process is finalized.
Now, we would like to point your attention to the “Account “username”: Success” links, located below the blue progress bar inside the “Transfer” or “Restore” sections.

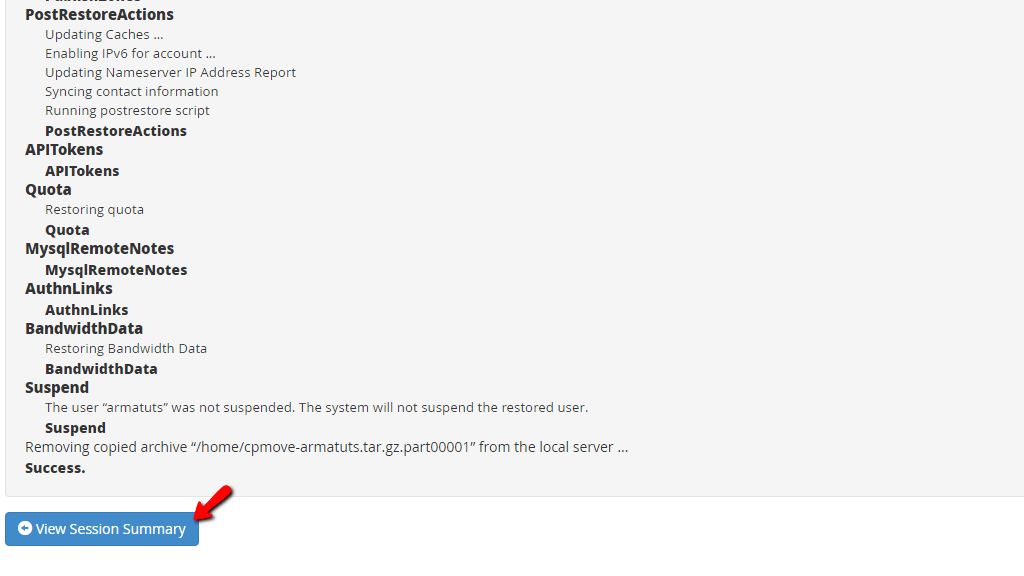
Upon clicking one of the above-mentioned links, you will be forwarded to a page, containing the log of the entire process from it’s beginning.

Located at the bottom of the page, you will find the “View Session Summary” button, which will bring you back to the “Summary” page you were previously on.
This sums up the entirety behind the “Transfer Tool” feature inside the WHM control panel. If you are a person constantly moving accounts from different servers, you will really appreciate this functionality and you will be using it with ease, now that you have read our tutorial! As always, if you experience any issues with this feature, please, do not hesitate to contact our Technical Support Team. They are reachable 24/7 over the ticketing system in your Client Area.

Sebahat is a young and bright woman who has become an invaluable part of our team. She started as a Customer Care Representative, mastering that role and, along the way, growing into a tech-savvy individual who is well acquainted with every support layer of the company. Driven by her aim to improve our customers’ experience constantly, she is committed to enhancing the extraordinary support we deliver.
Learn more about WHM in the other tutorials that we have: